1. Upgrade
The upgrade of ThinkLink consists of two parts: gateway upgrade and device upgrade, both involving the gateways and devices of the vendor. The firmware for gateway upgrades is managed by the vendor, and users can choose which firmware version to upgrade to. The device firmware is based on EB firmware, and the vendor's DTU and sensors are all built on EB code, making them upgradable. For EB encoding methods, please refer to EB compiler SDK instructions
After compilation, a file with the suffix .obin is generated, which serves as the upgrade firmware for devices.
1.1. Gateway Upgrade
To view firmware details, navigate to MAINTENANCE -> UPGRADE -> Gateway Firmware, where you can check the specific version number and related upgrade content.
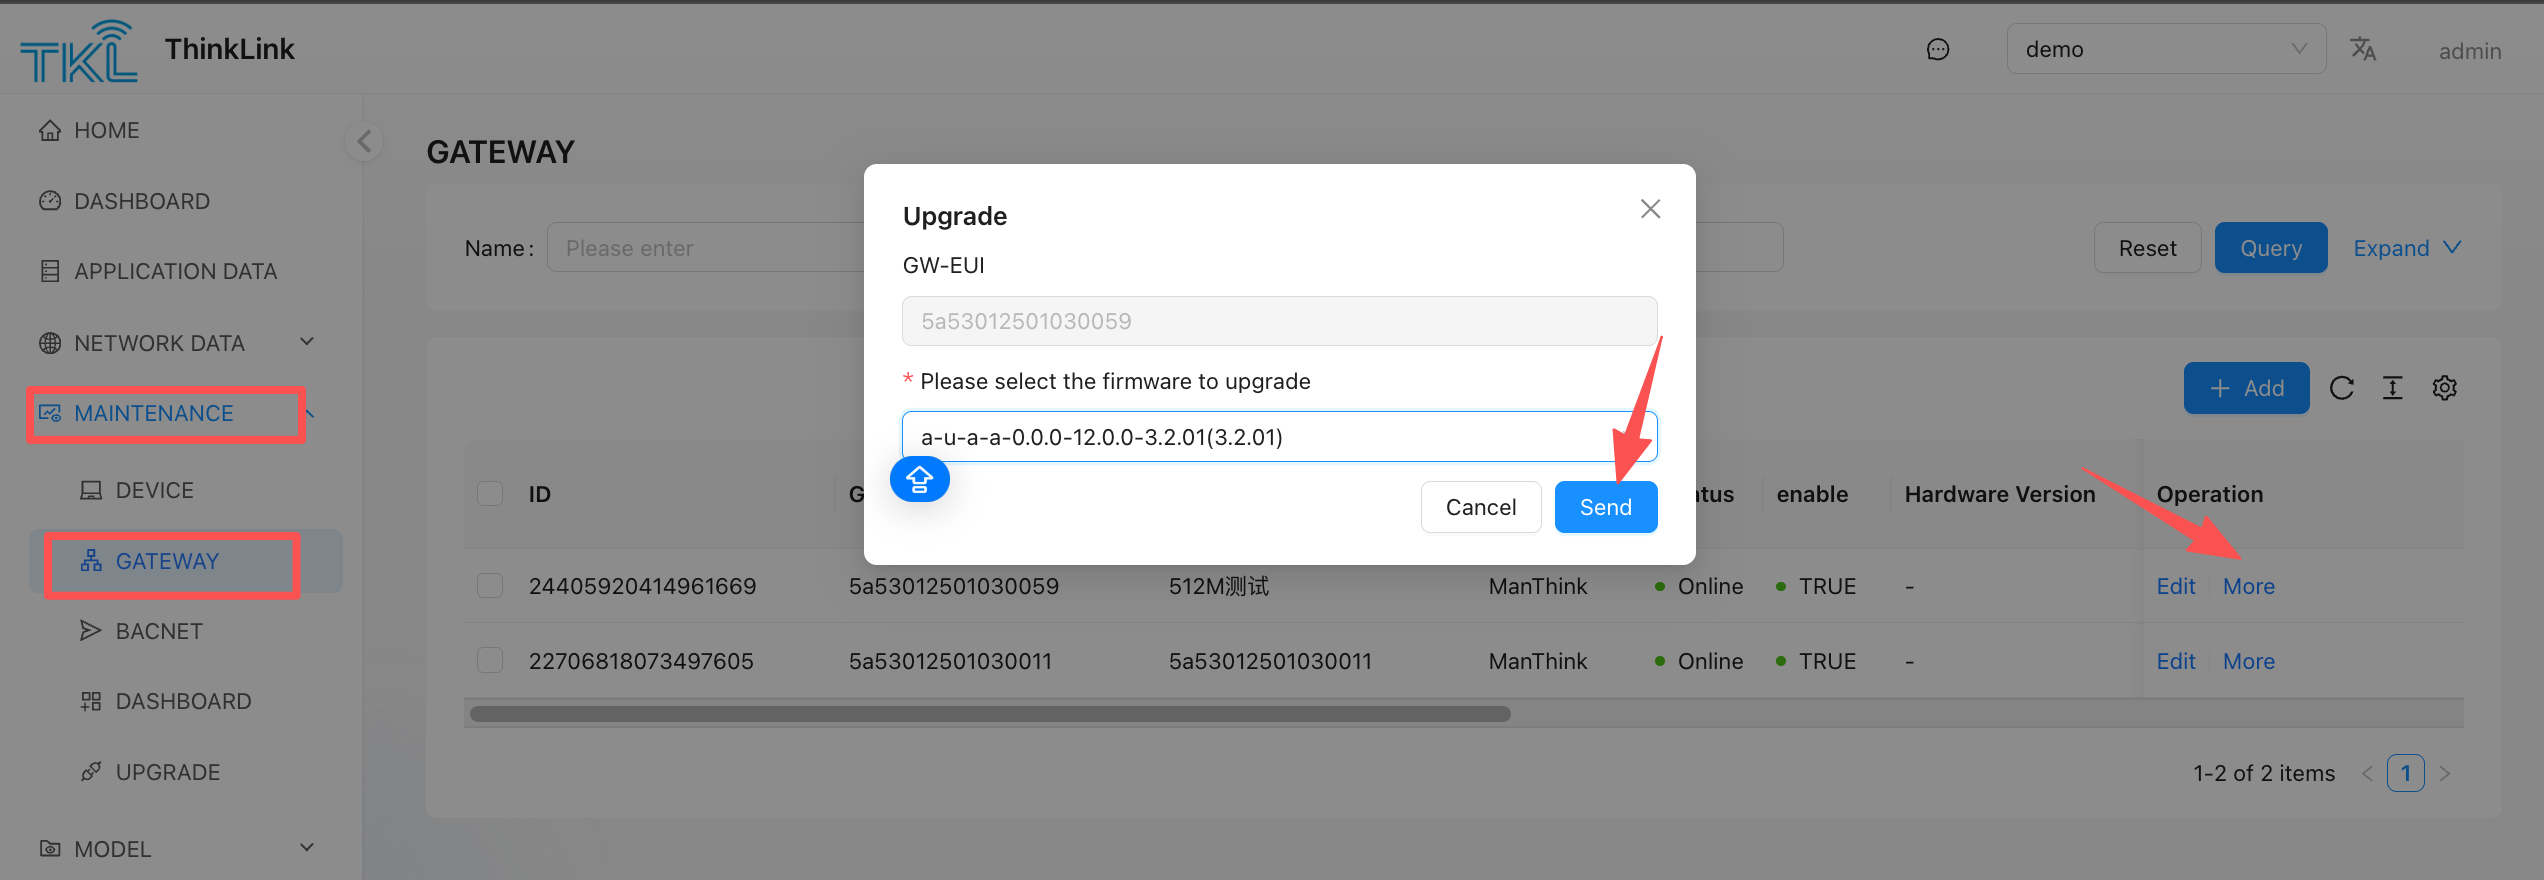
To upgrade the gateway, go to MAINTENANCE -> GATEWAY ->More ->Upgrade select the corresponding firmware to upgrade, and click Send to initiate the upgrade process.
1.2. Device Upgrade
Note: The device upgrade function is only applicable to devices equipped with the EB virtual machine. Make sure the MT-EB thing model is correctly mounted to the corresponding device; otherwise, the upgrade may fail due to inability to retrieve required parameter values.
Before performing a device upgrade, please check the device's shared property parameters. It is recommended to pre-configure the following default parameter values in the loading template, or obtain the actual runtime values by calling the [MT ACT] action -> app para read RPC API.
The following parameters must be configured:
- ✅ class_mode: Must match the device’s actual operating mode (ClassA or ClassC). If uncertain, trigger an uplink data packet—the system will automatically update this value
- ✅ swVersion: Default is
31. Should match the EB firmware version. It is recommended to use [MT ACT] action -> app para read RPC to obtain the accurate value - ✅ swSF: Default is
7(used in debug mode); must match the actual configuration or be obtained via [MT ACT] action -> cf para read - ✅ swBW: Default is
500kHz(used in debug mode), or retrieve actual value using [MT ACT] action -> cf para read - ✅ swFreq: Low-band default is
477300000Hz, high-band default is923000000Hz(used in debug mode), or obtain via [MT ACT] action -> cf para read - ✅ swPeriod: Default is
3000ms(used in debug mode), or retrieve via [MT ACT] action -> cf para read
It is recommended to use debug-related parameters cautiously in production environments and prioritize dynamically retrieving actual values via RPC interfaces to ensure successful upgrades.
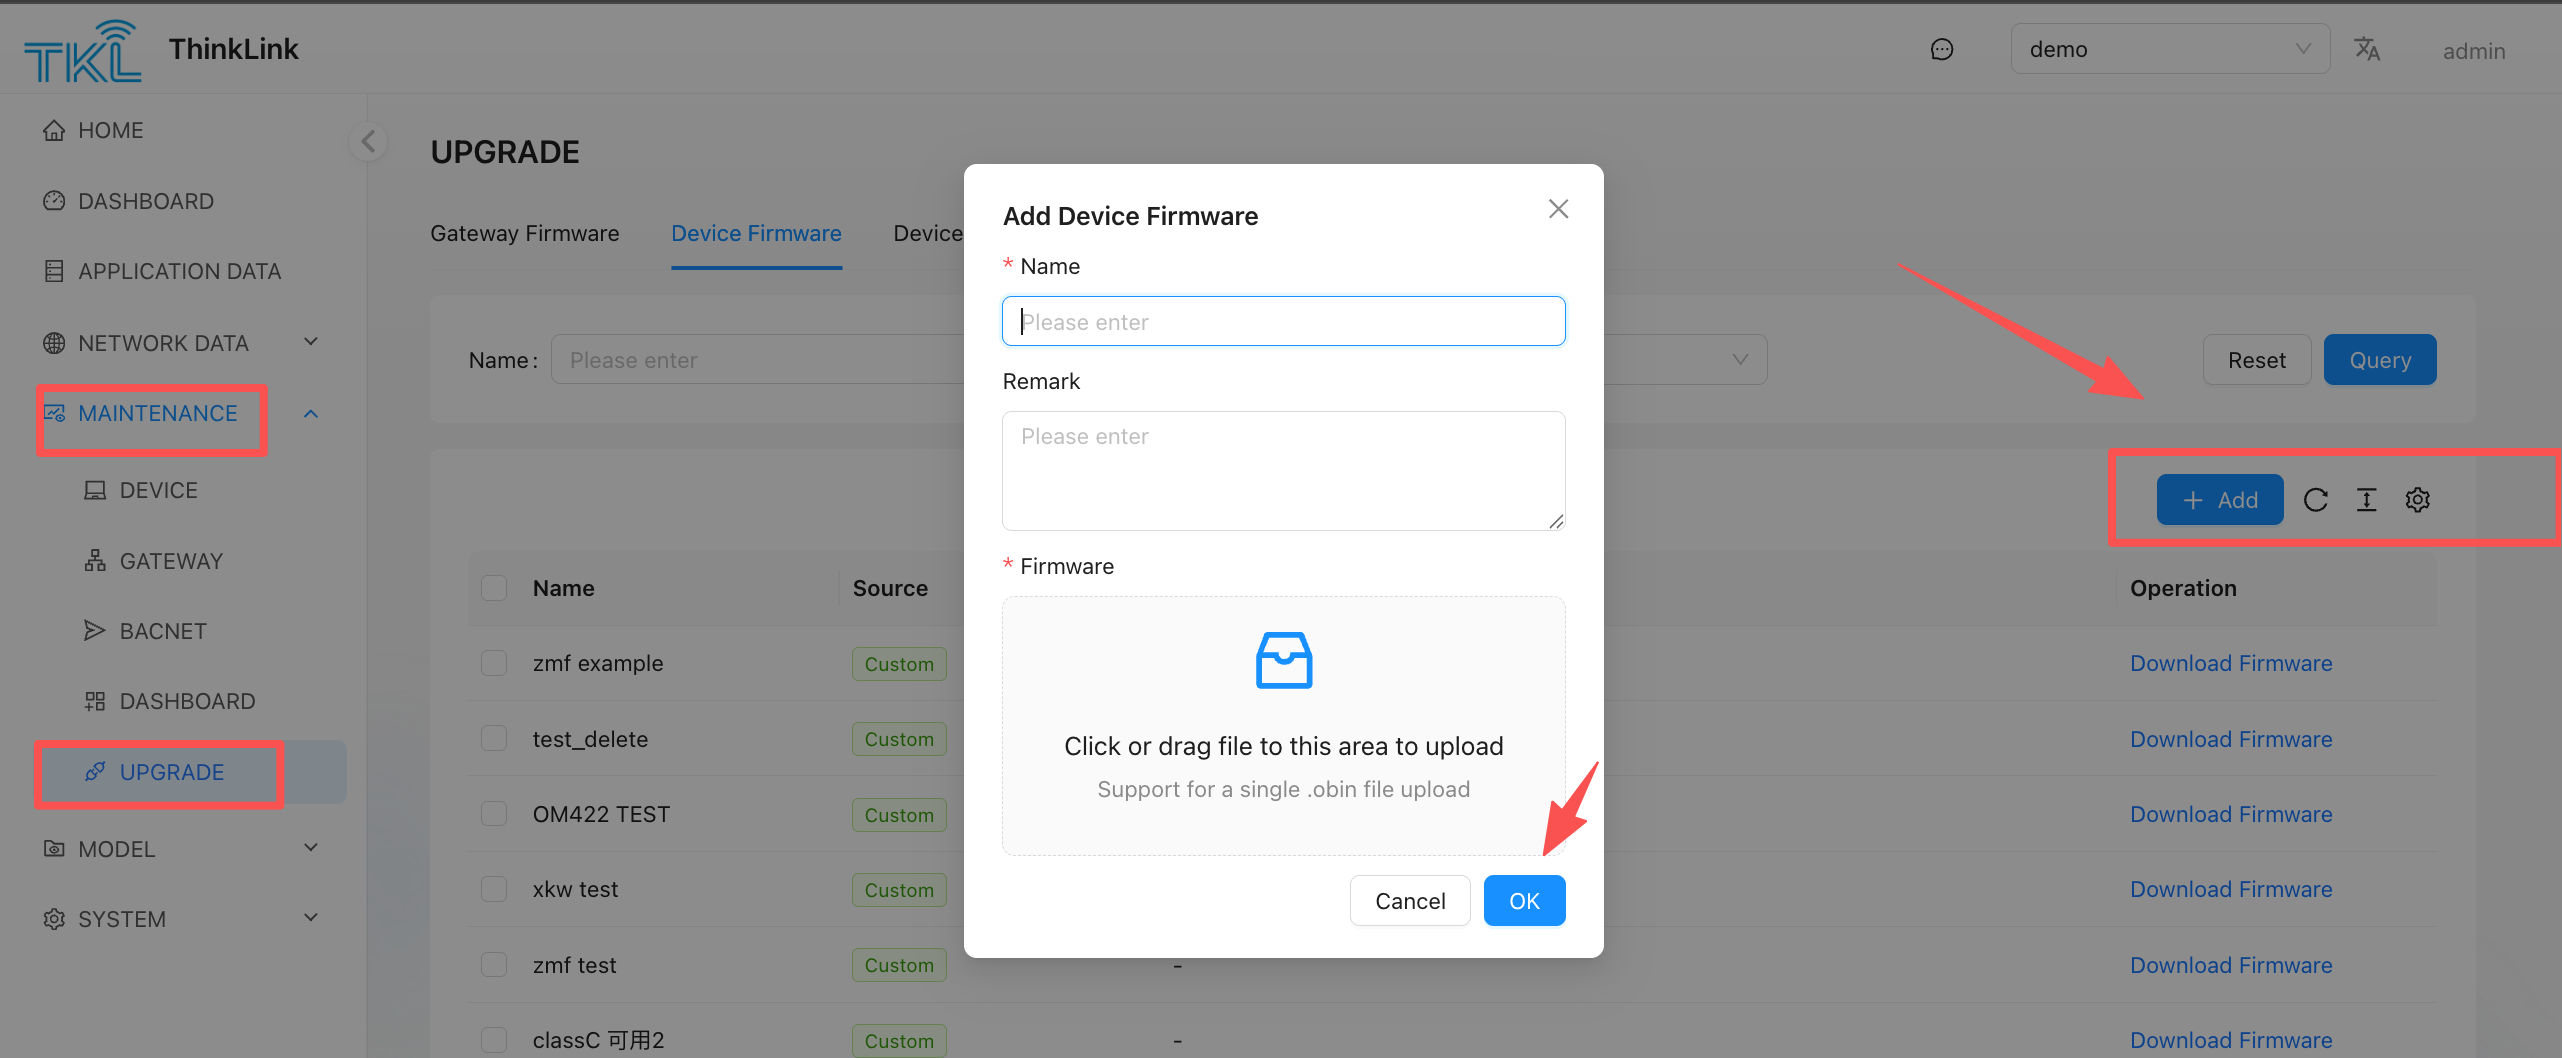
1.2.1. Import Firmware
Upload the .obin file compiled using the EB Compiler by navigating to MAINTENANCE -> UPGRADE -> Device Firmware This will import the firmware into the TKL platform.
If using the compiler built into ThinkLink, click "Save Firmware" to directly save the cloud-compiled firmware into the device firmware list.
1.2.2. Upgrade Devices
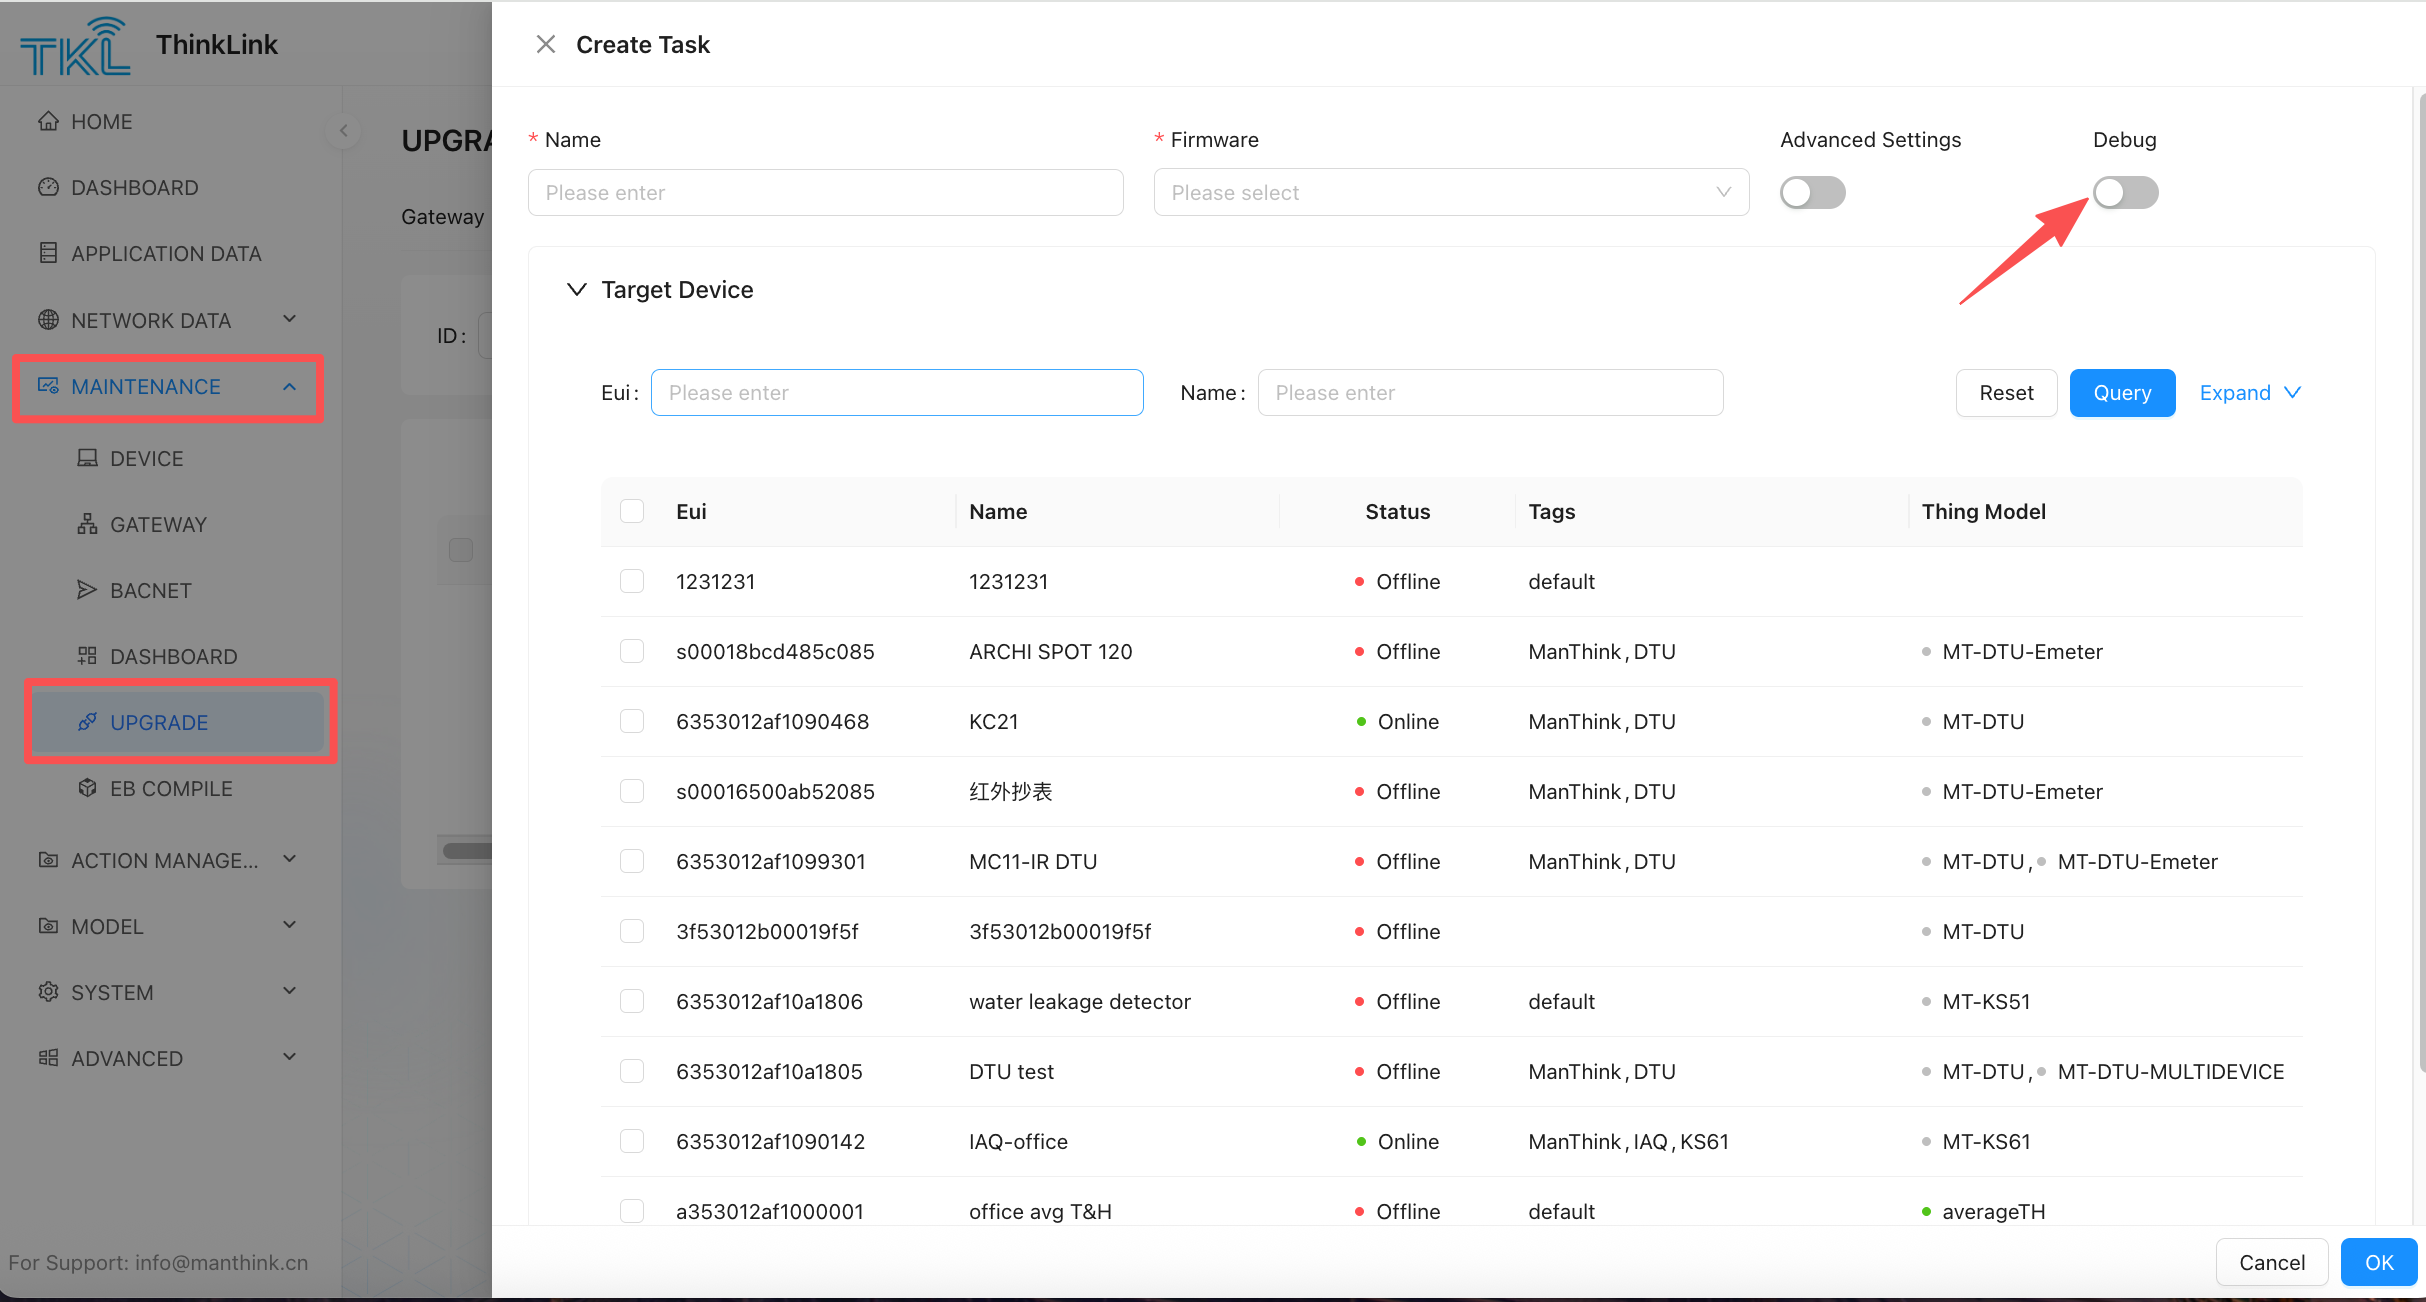
Go to MAINTENANCE -> UPGRADE -> Device Upgrade Task->CreatTask. Assign a name to the upgrade task and select the corresponding firmware. Use EUI or device name to filter the devices requiring upgrades. After filtering, multiple devices can be selected using the checkboxes on the left. Click Confirm to create the upgrade task and begin the process.
Note 1: Firmware upgrade for Class A devices requires an uplink data packet to be sent from the device before the upgrade process can be triggered.
Note 2: When Debug mode is enabled, an uplink packet is triggered via the device's EB SW mode. For Class A devices, once Debug mode is activated, there is no need to trigger an uplink packet using a magnet or other methods — the upgrade can proceed directly. However, the default SW parameters use a high-speed channel (SF=7, BW=500kHz), which has limited communication range and is not suitable for large-scale deployments. When using Debug mode, ensure that the SW parameters in the shared attributes match those of the actual device. If the SW parameters are unknown, use the RPC command
[MT ACT] action -> cf para readto retrieve the actual SW parameters from the device.
Note 3: Debug mode triggers upgrades one device at a time. Do not use Debug mode when upgrading multiple devices simultaneously, as this will cause conflicts.
Upgrade Mode: Parallel vs. Serial
The upgrade task supports two modes, configurable in Advanced Settings:
- Parallel mode: All selected devices receive firmware fragments simultaneously. Recommended for Class A devices — since Class A devices only receive downlinks after an uplink, parallel mode maximizes throughput across many devices.
- Serial mode: Devices are upgraded one by one in sequence. Recommended for Class C devices — since Class C devices can receive downlinks at any time, sending to all devices simultaneously increases the risk of channel collisions and packet loss.
| Device Class | Recommended Mode | Reason |
|---|---|---|
| Class A | Parallel | Uplink-triggered downlink; parallel avoids waiting for each device sequentially |
| Class C | Serial | Always-on reception; serial reduces collision risk |
Note: For Class A devices, the upgrade process is triggered only after the device sends an uplink data packet.
1.2.3. Common Causes of Upgrade Failure
If an upgrade fails, check the following in order:
- Device offline — The device is not connected to the network and cannot receive downlink data.
- class_mode mismatch — The
class_modeparameter in shared attributes does not match the device's actual operating mode. Trigger an uplink to let the platform auto-detect the correct value. - Class A uplink not triggered — Class A devices require at least one uplink packet before the platform can deliver the firmware. If no uplink is sent, the upgrade will not start.
- Packet loss due to high data density — Too many fragments sent too quickly cause channel congestion and packet loss, resulting in incomplete firmware delivery.
- Already up to date — The device's
bzTypeandbzVersionalready match the target firmware. No upgrade is needed; the task may appear to fail or skip. - Wrong upgrade mode — Using serial mode for Class A or parallel mode for Class C can cause timeouts or collisions. Follow the recommended mode for each device class.
- Poor signal quality — Low RSSI or SNR causes packet loss. Check the device's signal quality before upgrading.
- Advanced: redundancy for Class C signal issues — If a Class C device experiences packet loss due to poor signal or channel collisions, set the fragment redundancy count to
3in Advanced Settings. This sends each fragment multiple times to improve delivery reliability.
1.2.4. View Upgrade Status and Tasks
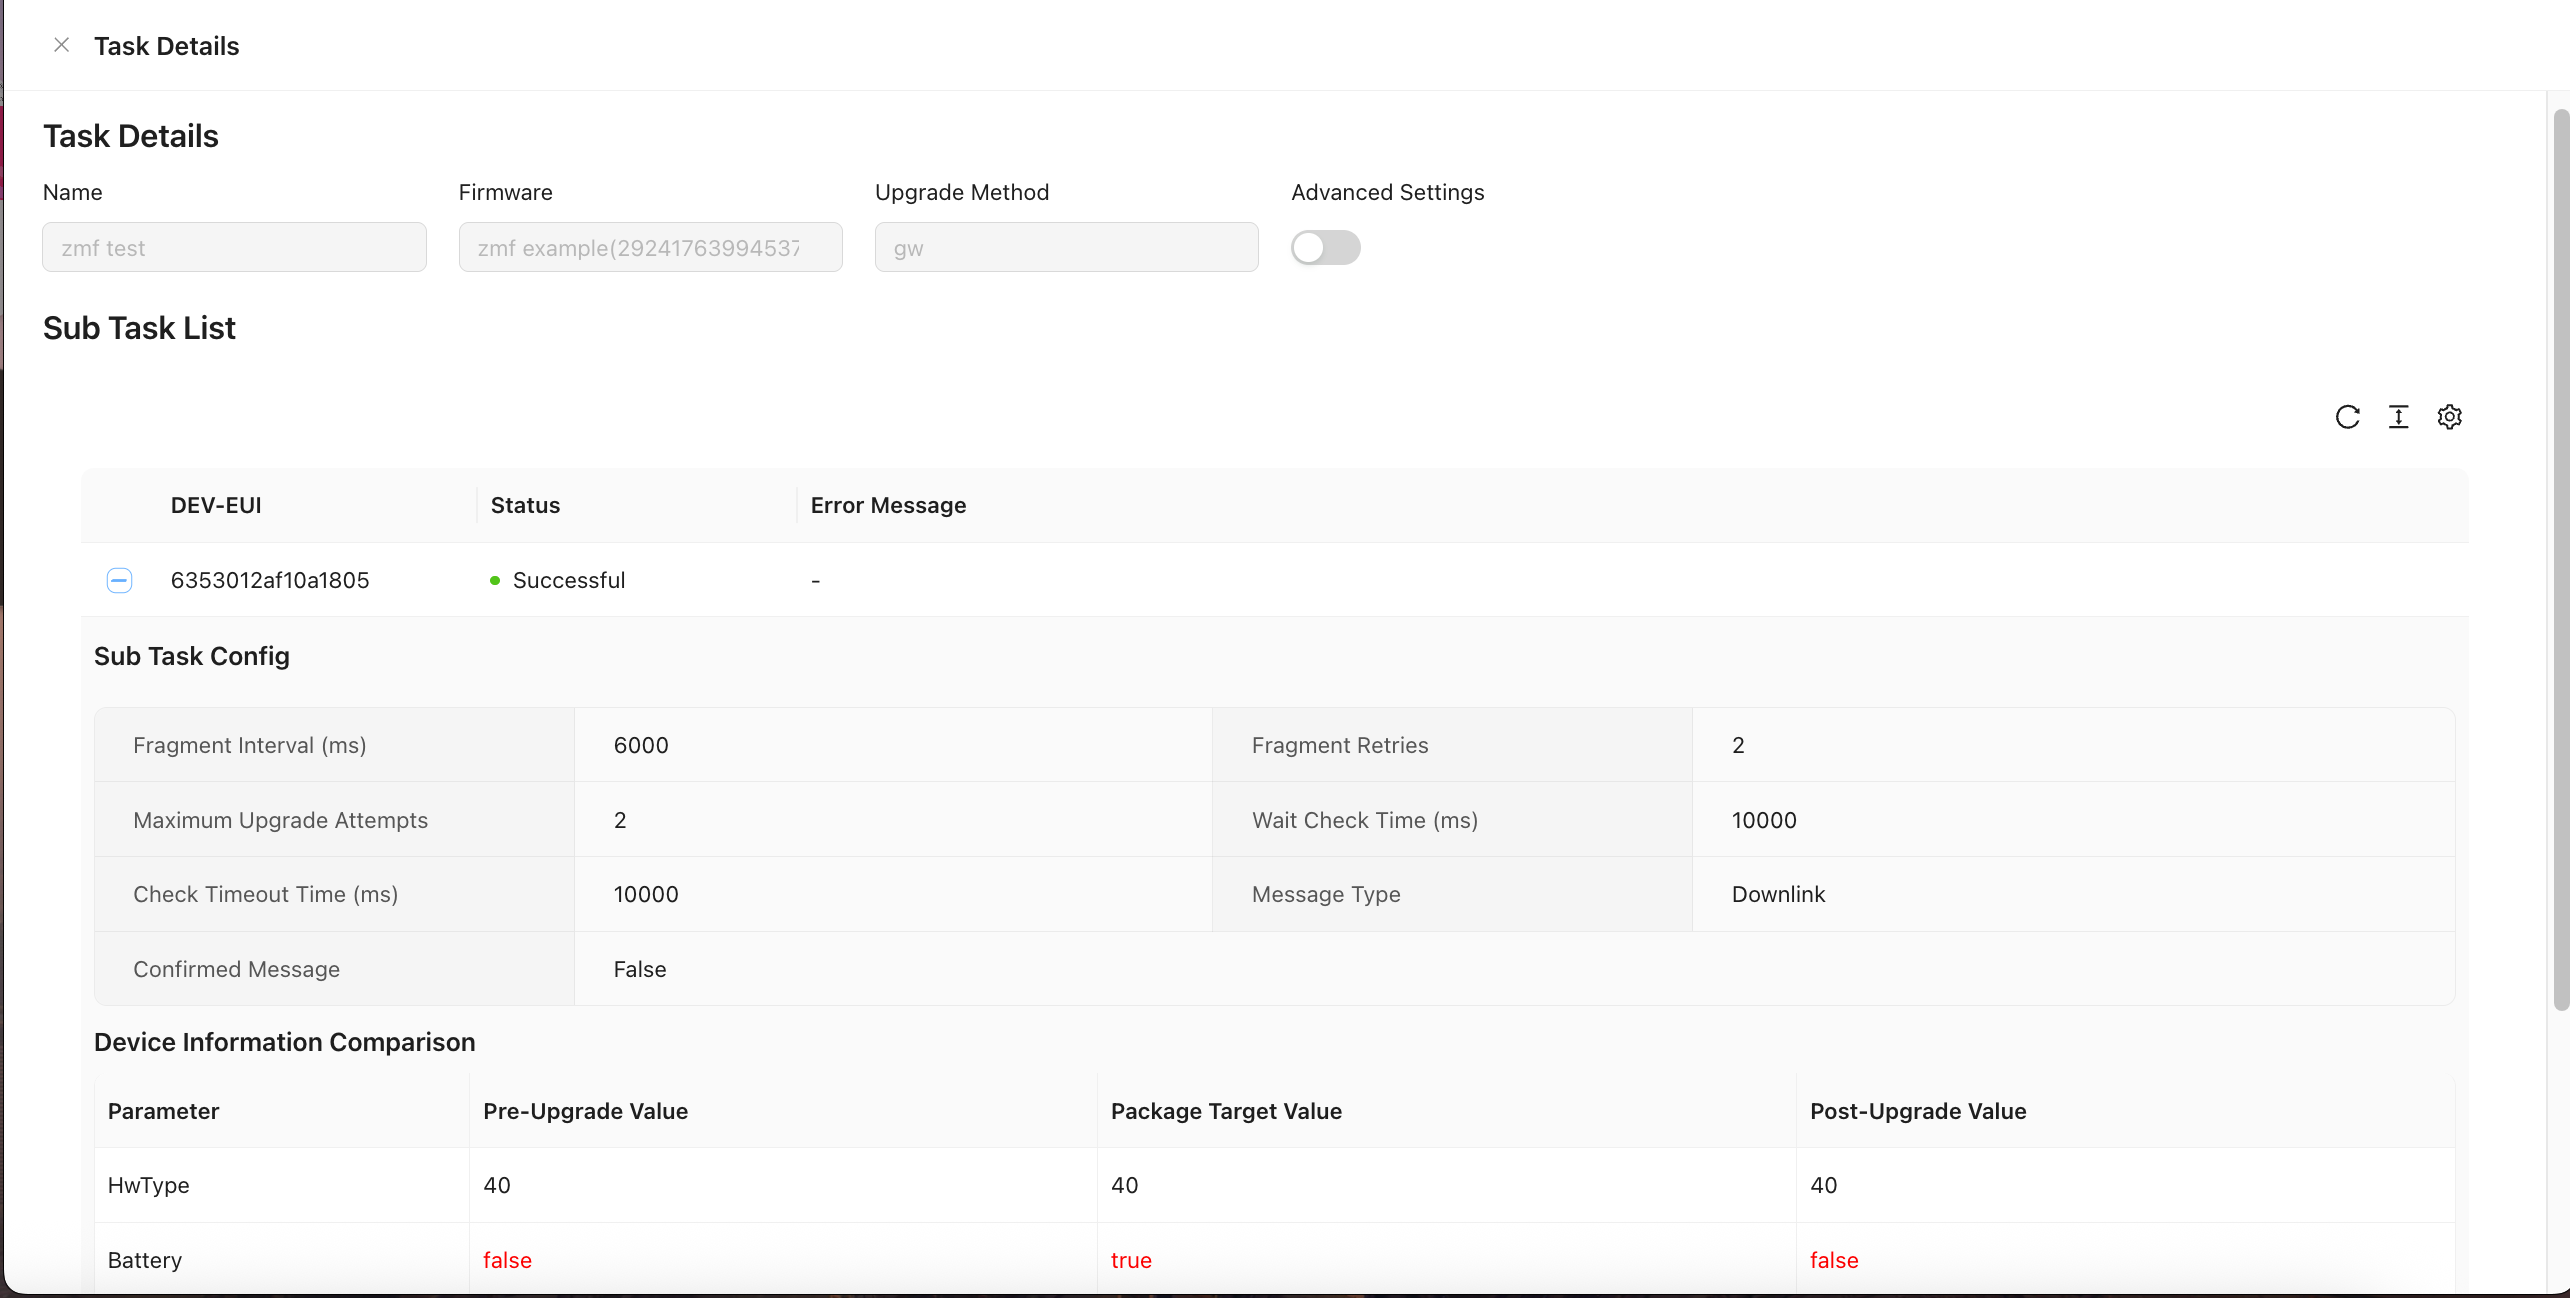
Click Task Details to check the status and results of the upgrade task.
Click the + next to a device to expand its upgrade details and view specific results.
If parameters are highlighted in red, it indicates an alarm regarding the upgrade result. Alarms are generated when:
- A Class A device is upgraded to Class C.
- A Class C device is upgraded to Class A.