1. Device Management
ThinkLink supports unified access and management of multiple device types. Data sources are not limited to LoRaWAN — any MQTT data conforming to the ThinkLink protocol can be integrated, including Modbus and RS-485 devices bridged through third-party gateways or DTUs.
Device Type Overview
| Device Type | device_type | Description |
|---|---|---|
| Normal Device | NORMAL | Terminals that report data directly via LoRaWAN or MQTT. Data source (data_from) can be LoRaWAN or OTHER (MQTT devices conforming to the ThinkLink protocol) |
| Sub-device | SUB_DEVICE | Virtual terminals auto-generated when a parent device (e.g. EdgeBus) polls child devices. Each polled device corresponds to one sub-device; the parent holds its EUI mapping |
| Asset | VIRTUAL | Aggregates data from multiple devices into a single logical entity, such as "total floor power consumption" or "average room temperature/humidity" |
Data source (
data_from):
LoRaWAN: Standard LoRaWAN devices accessed through ThinkLink NS. A LoRaWAN profile must be created first.OTHER: Third-party devices that push data directly via MQTT. Only the ThinkLink AS protocol message format is required; no LoRaWAN profile needed.
1.1. LoRaWAN Device Profile
A LoRaWAN Device Profile is the NS-layer identity configuration used for device join authentication (AppKey/AppSKey/NwkSKey) and communication parameter management. Profiles and devices are two independent objects: the profile controls whether the NS allows the device to join; the device controls the data processing layer (thing model / RPC / data storage). A devEUI must exist in a profile for Join to succeed; when profile enable=false, the NS does not respond to that device.
1.1.1. ABP vs OTAA
LoRaWAN supports two join modes, which determine which key fields are required in the profile:
| Item | ABP (Activation By Personalization) | OTAA (Over-The-Air Activation) |
|---|---|---|
| Join method | Device ships with pre-provisioned fixed DevAddr and session keys; no Join handshake needed | Device negotiates session keys dynamically via Join Request / Join Accept on power-up |
| Required keys | devAddr (device address) + apps_key (app session key) + nwks_key (network session key) | Only app_key (app master key); DevAddr is dynamically assigned by the NS |
| Config stability | DevAddr and keys are fixed; device re-joins instantly after reboot without NS involvement | Keys refresh after each Join; more secure but requires NS to be online for the handshake |
| Use case | Fixed deployments, simple network environments, fast onboarding or batch pre-provisioning | Higher security requirements, long-term operation, devices that migrate across networks |
ABP is recommended for most IoT projects. ABP is simpler to configure, and devices can reconnect after rebooting or losing network without a new Join handshake. With OTAA, every re-join requires a full handshake with the NS, which can fail in unstable network conditions.
ABP mode — required fields:
| Field | Description |
|---|---|
devEui | Device unique identifier; globally unique |
devAddr | Device address (4-byte hex, e.g. 32015019); must not conflict within the network |
apps_key | Application session key (16-byte hex); encrypts/decrypts application-layer data |
nwks_key | Network session key (16-byte hex); used for MIC validation and MAC command encryption |
OTAA mode — required fields:
| Field | Description |
|---|---|
devEui | Device unique identifier; globally unique |
app_key | Application master key (16-byte hex); derives session keys during the Join procedure |
1.1.2. Add a Single LoRaWAN Device Profile
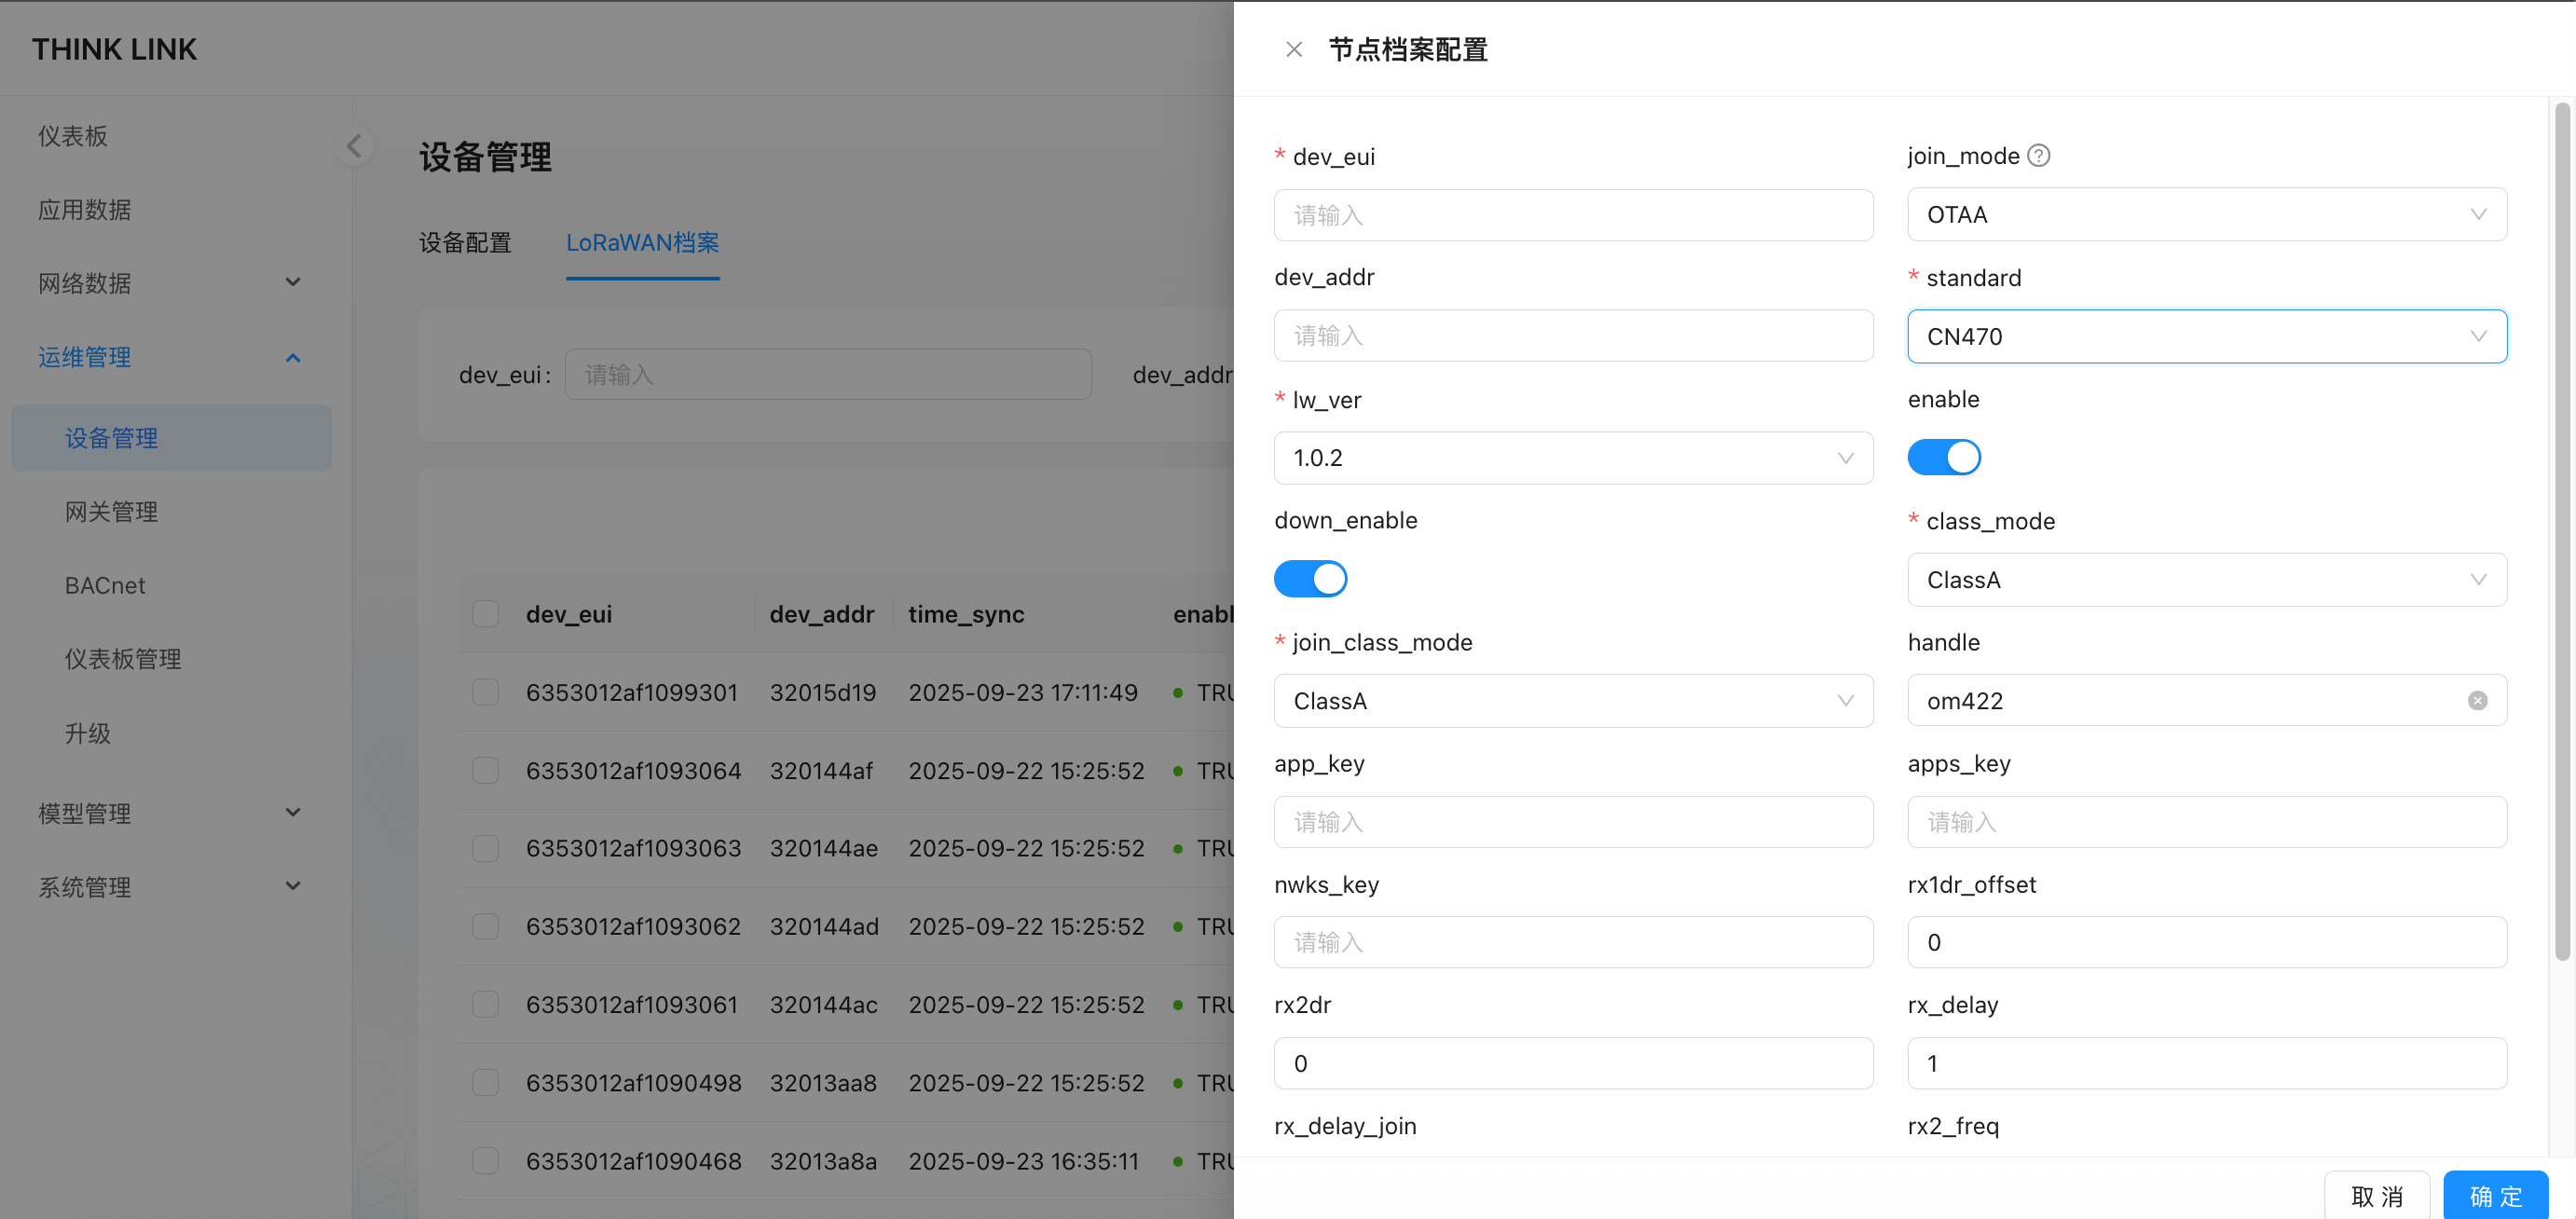
Full field reference:
| Field | Required | Description |
|---|---|---|
devEui | Required | Device unique identifier (EUI), globally unique, cannot be duplicated |
join_mode | Required | Join mode: ABP (pre-provisioned keys, recommended) or OTAA (over-the-air activation) |
devAddr | Required in ABP mode | Device address; must not conflict within the network |
apps_key | Required in ABP mode | Application session key (16-byte hex) |
nwks_key | Required in ABP mode | Network session key (16-byte hex) |
app_key | Required in OTAA mode | Application master key (16-byte hex) |
enable | Required (default TRUE) | Whether the NS responds to this device's join requests and uplinks. Setting to FALSE silently disables the device without affecting the device-side data records |
down_enable | Required (default TRUE) | Whether the NS is allowed to send downlink data to the device |
lw_ver | Required (recommended 1.0.2) | LoRaWAN protocol version; compatible with most 1.0.3 and some 1.0.4 regional protocols |
standard | Required | Frequency band standard: CN470 / EU433 / EU868 / AS923 / AU915 / US902 |
class_mode | Required (default ClassA) | Normal operating class: ClassA (low power, opens RX after TX) or ClassC (continuous RX, requires constant power) |
join_class_mode | Required (default ClassA) | Operating class after re-join; must match actual device behavior |
rx1dr_offset | Required (auto-filled by band) | RX1 window DR offset |
rx2dr | Required (auto-filled by band) | RX2 window data rate |
rx_delay | Required (default 1) | Delay in seconds before the first downlink window after an uplink |
rx_delay_join | Required (default 5) | Downlink response delay in seconds during the Join procedure |
rx2_freq | Required (auto-filled by band) | Fixed frequency for the RX2 receive window |
Tip: After selecting the correct
standardandlw_ver,rx1dr_offset,rx2dr,rx_delay,rx_delay_join, andrx2_freqare all auto-filled with defaults — no manual adjustment needed.
Profile vs. Device: The device profile is the NS-layer authentication config; the device is the data processing management entity. They are linked by
devEUI. When adding a device, selectLoRaWANas the data source and bind the corresponding profile. A device's profile should be active on only one platform (cloud / TKG / TKE) at a time, otherwise join conflicts will occur.
1.1.3. Bulk Import / Export of LoRaWAN Device Profiles (Excel)
Import:
- Download the template file (see example: mt_sdev_pf_macs--1756347416255.xlsx)
- Fill in device information per field requirements (ABP: fill
devAddr/apps_key/nwks_key; OTAA: fillapp_key) - Click "Import" to upload the Excel file — the system batch-creates the profiles
Export:
Click "Export" on the LoRaWAN profile list page to download all current profiles as an Excel file, useful for backup or for importing into another ThinkLink instance.
1.1.4. Sync Profiles from Remote Platform (Remote Pull)
In distributed deployment scenarios (TKG gateway local NS / TKE edge server), device LoRaWAN profiles are typically managed on a central platform. The local instance can sync profiles down via Remote Data Pull:
- Go to Advanced → Remote Data Pull (see Remote Data Pull)
- Configure the upstream URL and
secret_key - Select LoRaWAN Profiles from the pull list and execute
- The system writes upstream profile data to the local NS; existing records with the same
dev_euiare overwritten
Typical workflow: An engineer registers all device profiles on the cloud platform, then field gateways sync with one click — no need to re-enter profiles locally.
1.1.5. Add LoRaWAN Devices via Template
When batch-onboarding devices of the same model, create a device configuration template first and then use it to quickly provision devices:
- Click "Add" on the Device Management page
- Enter the device
EUI(required) and a name (optional) - Select a pre-created Configuration Template (contains thing model, RPC, attributes, and other default config)
- Set Data Source to
LoRaWAN - After submitting, the system checks whether a LoRaWAN profile already exists for that EUI:
- Profile exists: device is created immediately with the template config applied
- No profile: a prompt appears — choose "Add Now" to jump to the profile configuration page, or "Add Later" to save the device first
Tip: A configuration template pre-fills thing models, RPCs, server attributes, shared attributes, tags, and more. Devices of the same model only need to select the same template at creation time — no need to configure each one manually.
1.1.6. Reset Devices to Template
Resets the full configuration of selected devices to the default values of a specified template:
- Select one or more devices in the Device Management list
- Click "Reset by Template" in the bulk action toolbar
- In the dialog, select the target Configuration Template
- After confirming, the following config on all selected devices is overwritten with the template content:
| Reset Content | Description |
|---|---|
Thing model (thing_model) | Replaced with the template's thing model list |
RPC (rpc) | Replaced with the template's RPC list |
Trigger (trigger) | Replaced with the template's trigger list |
Shared attributes (shared_attrs) | Reset to each field's default value from the template |
Server attributes (server_attrs) | Reset to each field's default value from the template |
Tags (tags) | Replaced with the template's tags |
Heartbeat period (heart_period) | Replaced with the template value |
| Real-time storage, ThingsBoard, BACnet switches | Replaced with the template config |
Note: The device's
EUI,name,data_from, and LoRaWAN profile are not reset and remain unchanged. This operation cannot be undone — confirm you have selected the correct template.
Profile vs. Downlink Capability
⚠️ A LoRaWAN profile alone does not enable downlink.
The LoRaWAN profile only handles NS-layer join authentication — it controls whether the device can come online and send uplinks. RPC downlink is a data-processing-layer capability. To send commands to a device, you must first create a device record in Device Management and mount at least one RPC model on it.
Quickest path to downlink: If you just need to send raw downlink bytes without defining a custom RPC, select the built-in
DEFAULTtemplate when adding the device. This template comes pre-loaded with the system built-in RPCmt_act_dn_data. Once the device is added, open its RPC tab, executemt_act_dn_data, fill inport(FPort) anddata(hex string), and the LoRaWAN downlink is sent immediately.
1.2. Add Device
1.2.1. Add a Single Device
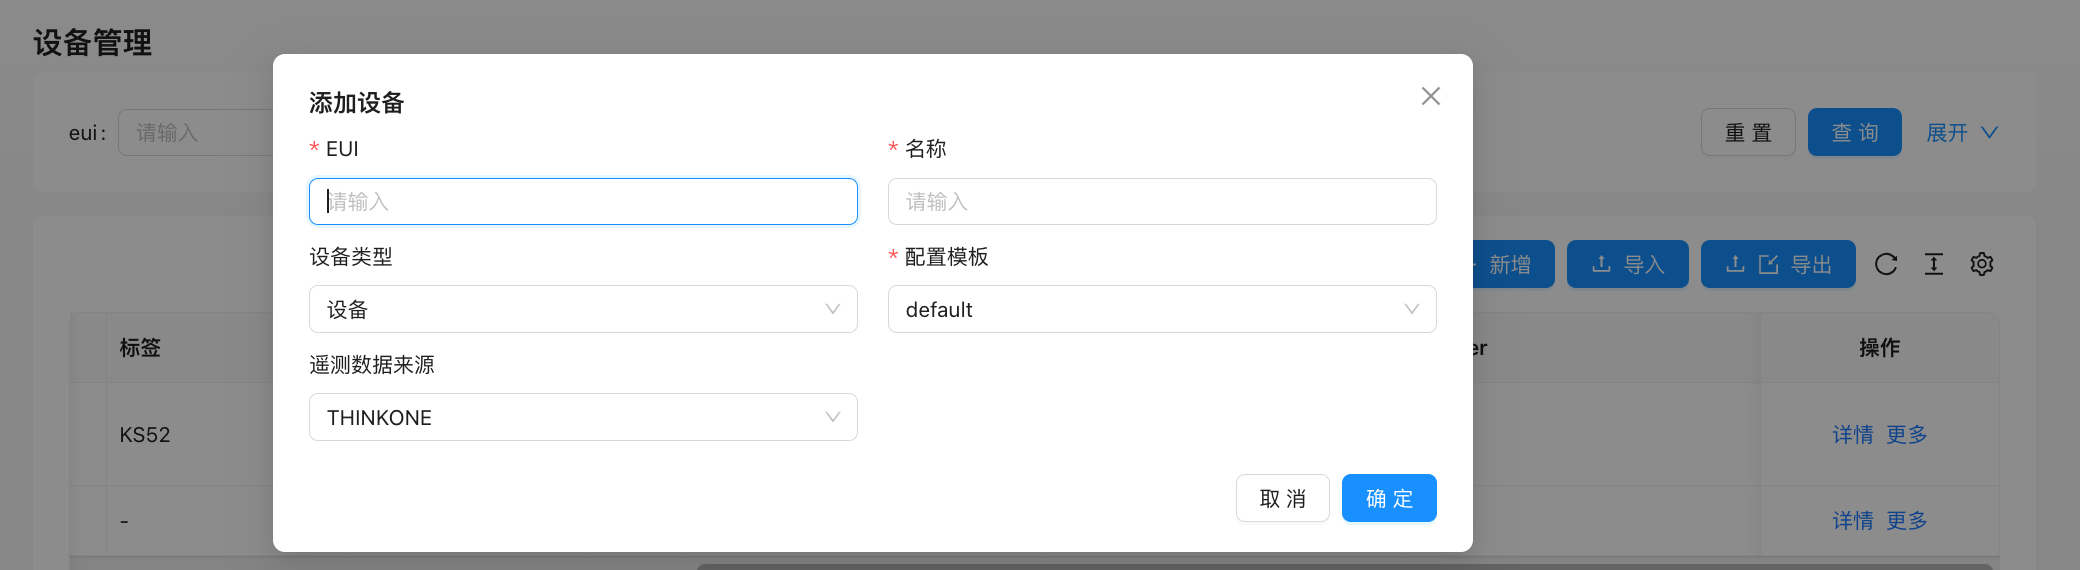
| Field | Description |
|---|---|
| EUI | Device unique identifier; must be globally unique within the ThinkLink system |
| Name | User-defined device name |
| Device Type | Device (normal / sub-device) or Asset (virtual aggregation device) |
| Data Source | LoRaWAN: accessed via ThinkLink NS; OTHER: push directly via MQTT, conforming to the ThinkLink protocol |
| Configuration Template | Selecting a preset template quickly binds thing model, RPC, and other config; recommended for batch onboarding of same-model devices |
Non-LoRaWAN device access: For devices with data source
OTHER, simply ensure the reported MQTT message format conforms to the ThinkLink AS protocol. No LoRaWAN profile binding is needed. Suitable for devices connected via DTU, Modbus gateway, or custom MQTT client.
1.2.2. Bulk Add Devices
- Select existing devices and click "Export" to download a template
- Fill in or modify other device information — the
EUIfield is mandatory - Delete columns that do not need modification
- Execute bulk import:
- If the same EUI already exists in the system → update that device's parameters
- If the EUI does not exist → add as a new device
⚠️ Ensure each device's EUI is unique and accurate.
1.2.3. One-Time RPC (Bulk Command Dispatch)
A one-time RPC sends the same command to a group of devices ad-hoc — it executes immediately and is discarded afterward with no recurring schedule saved. Typical uses: batch-updating device parameters (sampling interval, thresholds) or triggering a one-off operation (restart, reset, calibration).
Steps:
- Select one or more target devices in the Device Management list
- Click "One-Time RPC" in the bulk action toolbar
- In the dialog, fill in:
- Name: a descriptive label for this execution task (shown in the task monitor)
- Device interval (ms): delay between consecutive dispatches to avoid burst concurrency; leave blank to use no delay
- RPC and parameters: select the RPC model and fill in the corresponding parameters
- Click "Submit" — the system immediately starts dispatching to each device in sequence; the dialog shows a real-time progress bar (current / total)
Monitor running tasks:
Click "View Running Tasks" in the bulk action toolbar to open the task monitor panel, which lists all active one-time RPC tasks with their name, start time, and live progress. Click "Interrupt" on a task to stop it early.
Difference from Multi-Device RPC: Multi-Device RPC (under the Configuration Management menu) supports saving tasks, scheduled execution, and recurring triggers. One-time RPC is a single ad-hoc execution — no config is saved.
1.2.4. Bulk Update Device Configuration
Bulk update lets you apply the same configuration changes to multiple selected devices at once. Only the fields you explicitly configure in each step are modified; all other fields remain unchanged.
Steps:
- Select the devices to modify in the Device Management list
- Click "Bulk Update Parameters" in the bulk action toolbar
- Work through the step-by-step wizard — each step can be configured independently:
| Step | Editable Content |
|---|---|
| Basic Info | Name, device type, heartbeat period, real-time storage, ThingsBoard / BACnet / HomeAssistant switches. Each field has a checkbox — only checked fields are modified |
| Update Thing Model | Add thing models to selected devices (left → right in transfer table), or remove existing ones |
| Update RPC | Add or remove RPC bindings on selected devices |
| Update Trigger | Add or remove trigger bindings on selected devices |
| Update Server Attributes | Add new key-value pairs (with data type and default value), or delete existing attribute keys |
| Update Shared Attributes | Add new key-value pairs, or delete existing attribute keys |
| Delete Telemetry Data | Delete telemetry records by thing model — select which thing models' data to purge |
| Update Tags | Add new tags (type and press Enter) or delete existing tags |
| Confirm & Submit | Review the list of devices that will be affected, then submit |
- Click "Submit" on the final step to apply all changes to the selected devices
Note: Steps can be navigated freely by clicking the step title at the top. Adding and removing thing models / RPCs / triggers are incremental operations — they do not clear existing bindings; they only add to or remove from the current list.
1.3. Device Details
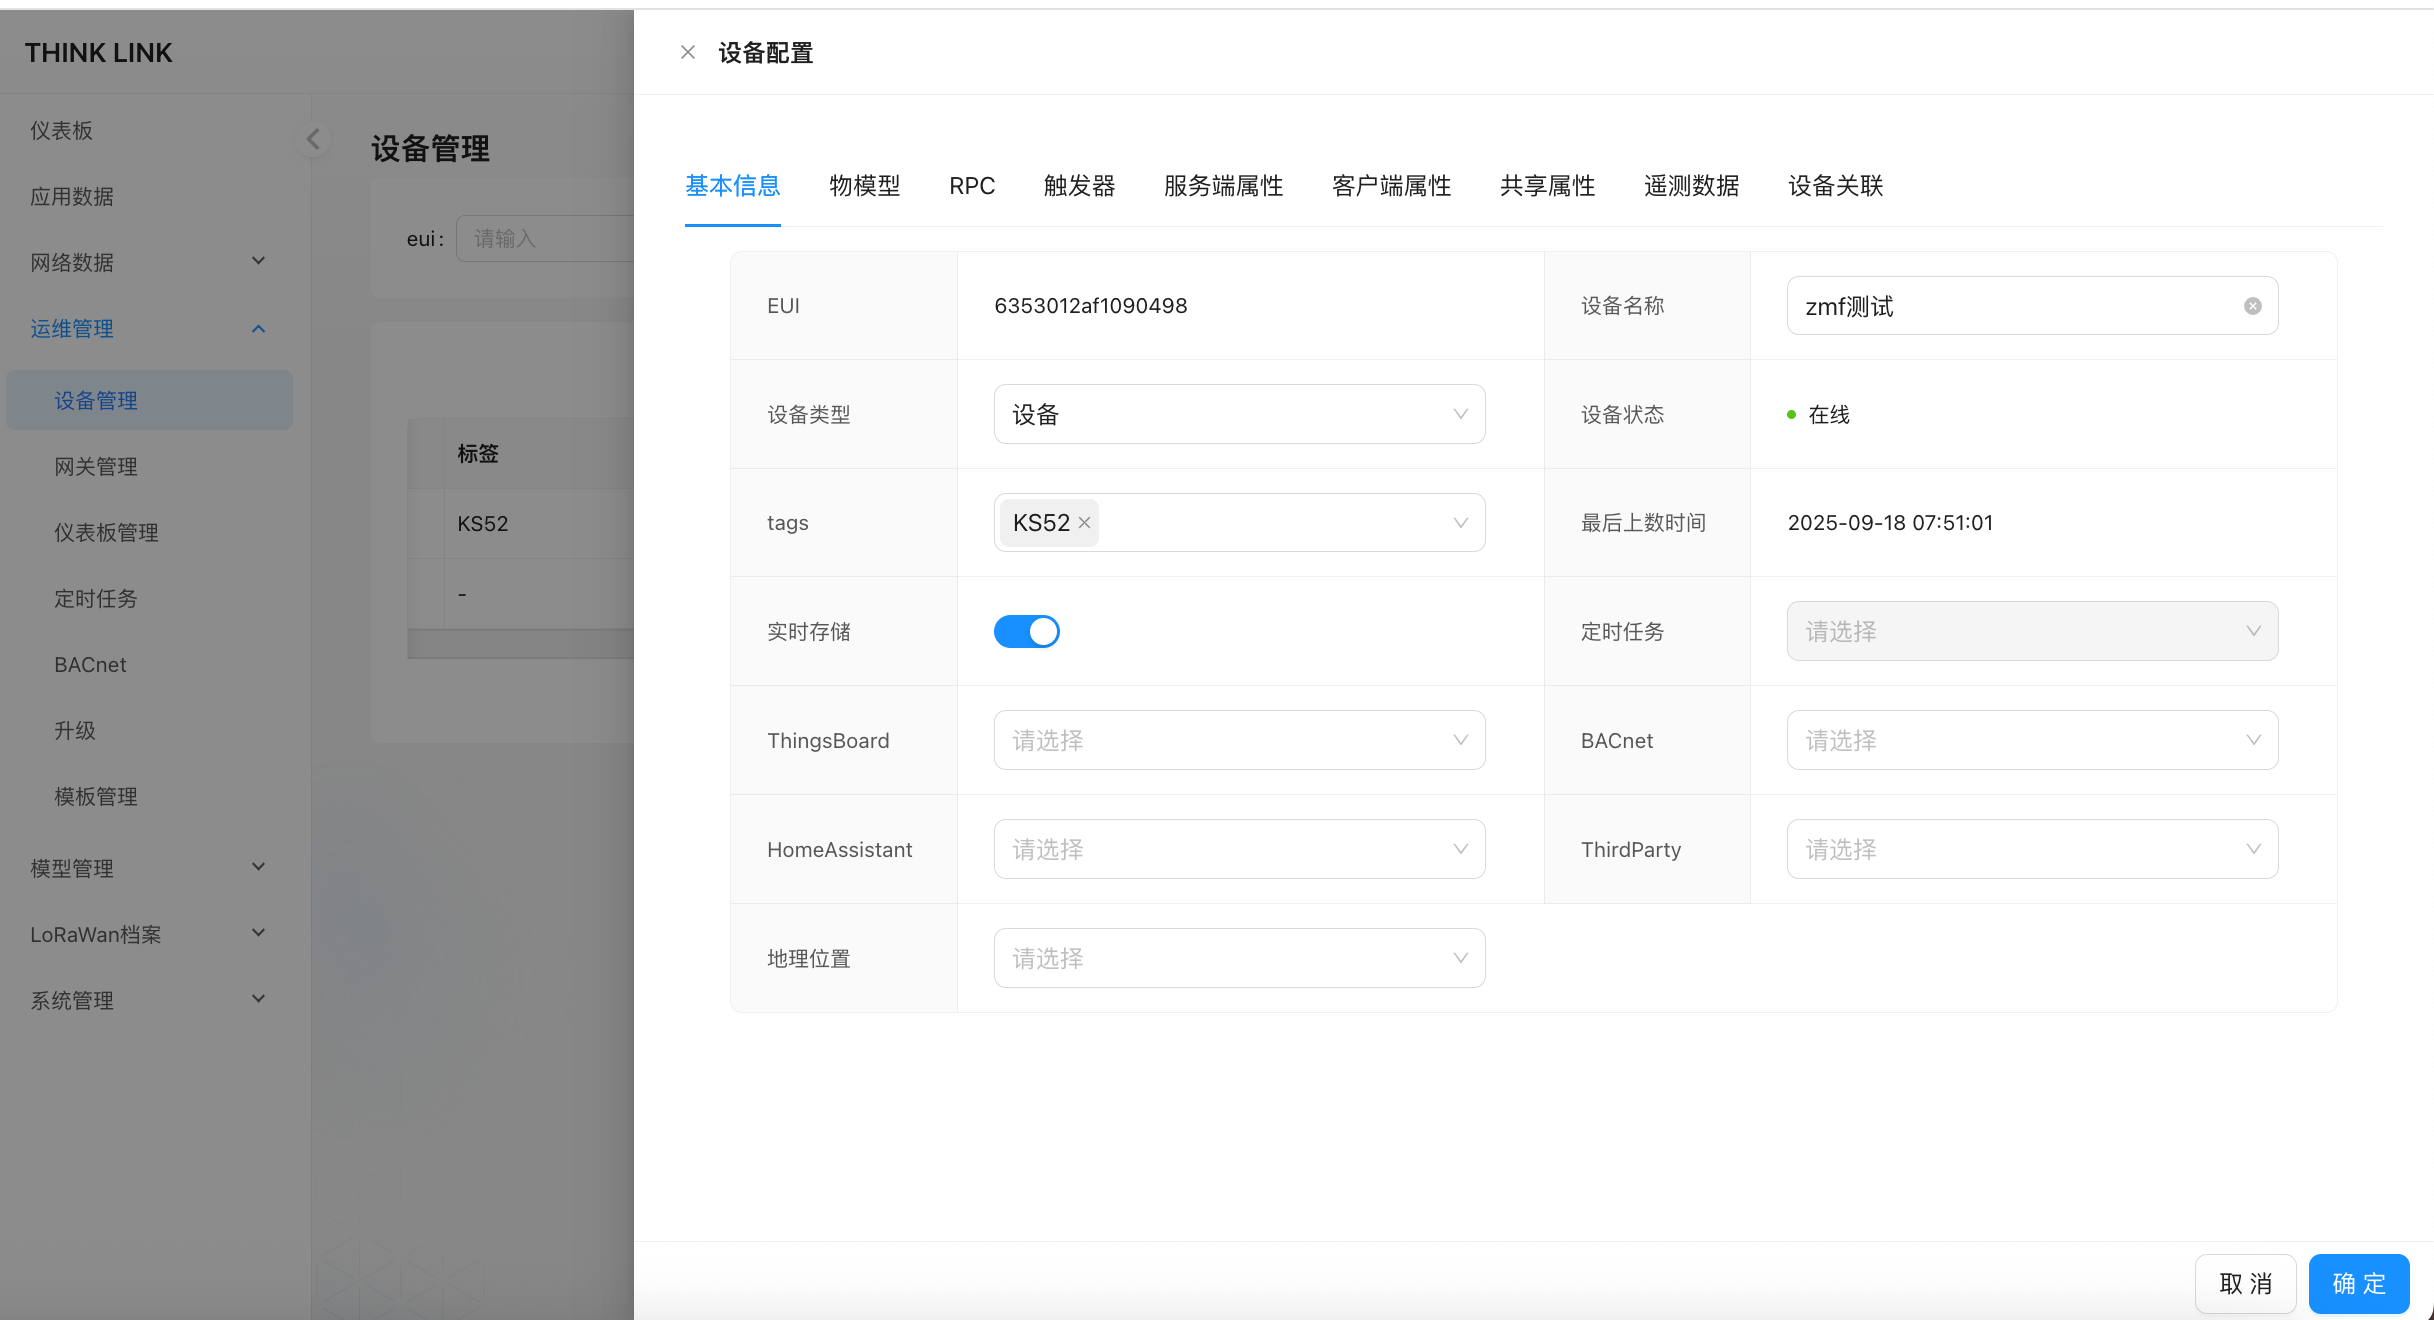
1.3.1. Thing Model
The Thing Model tab lists all thing models bound to this device, along with their scope (PUBLIC built-in or tenant-private).
In this tab you can:
- Add: click "Add" to select and mount a thing model. One device can have multiple thing models, each with its own payload parsing script; parsed results are stored in separate telemetry partitions keyed by thing model ID
- Remove: detach a thing model from the device (the thing model itself is not deleted)
What thing models do:
- Parse raw device payloads into structured data (temperature, humidity, energy, status bits, etc.)
- Each thing model has an independent JavaScript parser that returns
telemetry_data,server_attrs,shared_attrs, etc. - Asset (
VIRTUAL) device thing model scripts receive data notifications from associated source devices and perform aggregation
For thing model scripting details → Thing Model
1.3.2. RPC
The RPC tab lists all RPC models bound to this device. You can trigger commands directly from here.
In this tab you can:
- Add / Remove: bind or unbind RPC models; multiple RPC models per device are supported
- Execute: click the "Execute" button next to any RPC entry to dispatch the command:
- No-parameter RPC: sent immediately without confirmation
- Parameterized RPC: a parameter input dialog appears; default values can be pre-filled from
shared_attrs/server_attrs
Three places to execute an RPC:
| Entry point | Location | Use case |
|---|---|---|
| Device Config → RPC tab | Maintenance → Device Management → Details → RPC | Manual dispatch for a single device during debugging or routine operation |
| Application Data → Action column | Data → Application Data → Realtime Data list (rightmost column) | Quick dispatch while browsing live device data |
| Dashboard component | Dashboard cards configured with RPC buttons | Operations staff execute routine actions (open/close valve, reset device) from the dashboard |
Bind to a Device Execution (scheduled dispatch):
Besides manual Execute, the RPC list now has a "Bound Device Executions" column. You can add an RPC to a Device Execution task so it is dispatched automatically on a scheduled-task cycle, with no manual trigger:
- Bound device executions are shown as tags; click a tag to open that device execution's configuration drawer.
- Click the dashed "+ Add to Device Execution" tag and choose from the dropdown:
- Create New Device Execution: opens the device-execution drawer pre-filled with the current RPC and the current device's EUI; you can then pick a scheduled task, the execution type (Unlimited / Fixed Count), the per-device send interval, etc., and save.
- Add to Existing: appends the current device to an already-existing device execution task.
- Only an RPC that is already bound to the current device can be added to a device execution (otherwise you are prompted to bind it in the RPC list first).
For Device Execution and Scheduled Task fields, cron expressions, execute/stop and logging → Device Action · Scheduled Tasks
For RPC model definition (command format, parameter templates) → RPC Model
1.3.3. Server Attributes
Server attributes are key-value pairs maintained entirely on the platform side, independent of device-reported telemetry. The device is not aware of these values.
In this tab you can:
- Add: define a new key with an initial value and optional metadata (type, unit, alias, remark, linked RPCs)
- Edit: modify an existing attribute value directly; changes take effect immediately
- Delete: remove a key
Uses of server attributes:
| Use | Description |
|---|---|
| Logic parameters | Thing model scripts read device.server_attrs to drive calculations or alert conditions (thresholds, coefficients) |
| RPC default parameters | RPC templates can reference server_attrs fields as default parameter values |
| Cross-device state cache | Asset devices cache each source device's latest readings in server_attrs for aggregation |
| Operational metadata | Installation location, responsible engineer, maintenance date — fields that don't affect data processing |
Attribute metadata fields:
| Field | Description |
|---|---|
type | Data type (string / number / boolean) — controls the editor widget |
unit | Unit label (e.g. ℃, kWh) — display only |
alias | Display name used in dashboards and alerts |
remark | Notes for the operator explaining the field's purpose |
rpcs | Associated RPC IDs — a shortcut button on the attribute row triggers the linked RPC |
order | Display order; lower number appears first |
1.3.4. Shared Attributes
Shared attributes are key-value pairs synchronized bidirectionally between the platform and device. This is the primary mechanism for pushing configuration parameters from the platform down to devices.
In this tab you can:
- Add / Edit / Delete: same operations as server attributes, with the same metadata fields
- Push on change: when a value is edited here, ThinkLink automatically sends the updated value down to the device via LoRaWAN downlink or MQTT
Shared Attributes vs. Server Attributes:
| Shared Attributes | Server Attributes | |
|---|---|---|
| Sync direction | Platform ↔ device (bidirectional) | Platform only — device is unaware |
| Typical uses | Sampling interval, working mode, OTA flag | Thresholds, coefficients, operational notes |
| Device-readable | Yes — device can request or receive push updates | No — accessible only via scripts |
| Edit triggers downlink | Yes | No |
1.3.5. Telemetry Data
The Telemetry Data tab groups live data by thing model, showing each field's latest parsed value and timestamp.
In this tab you can:
- View live values: data is pushed in real time via MQTT when the device details drawer is open — no manual refresh needed
- Delete: remove a whole thing model's telemetry records (useful to reset stale data or clean up test data)
1.3.6. Device Association
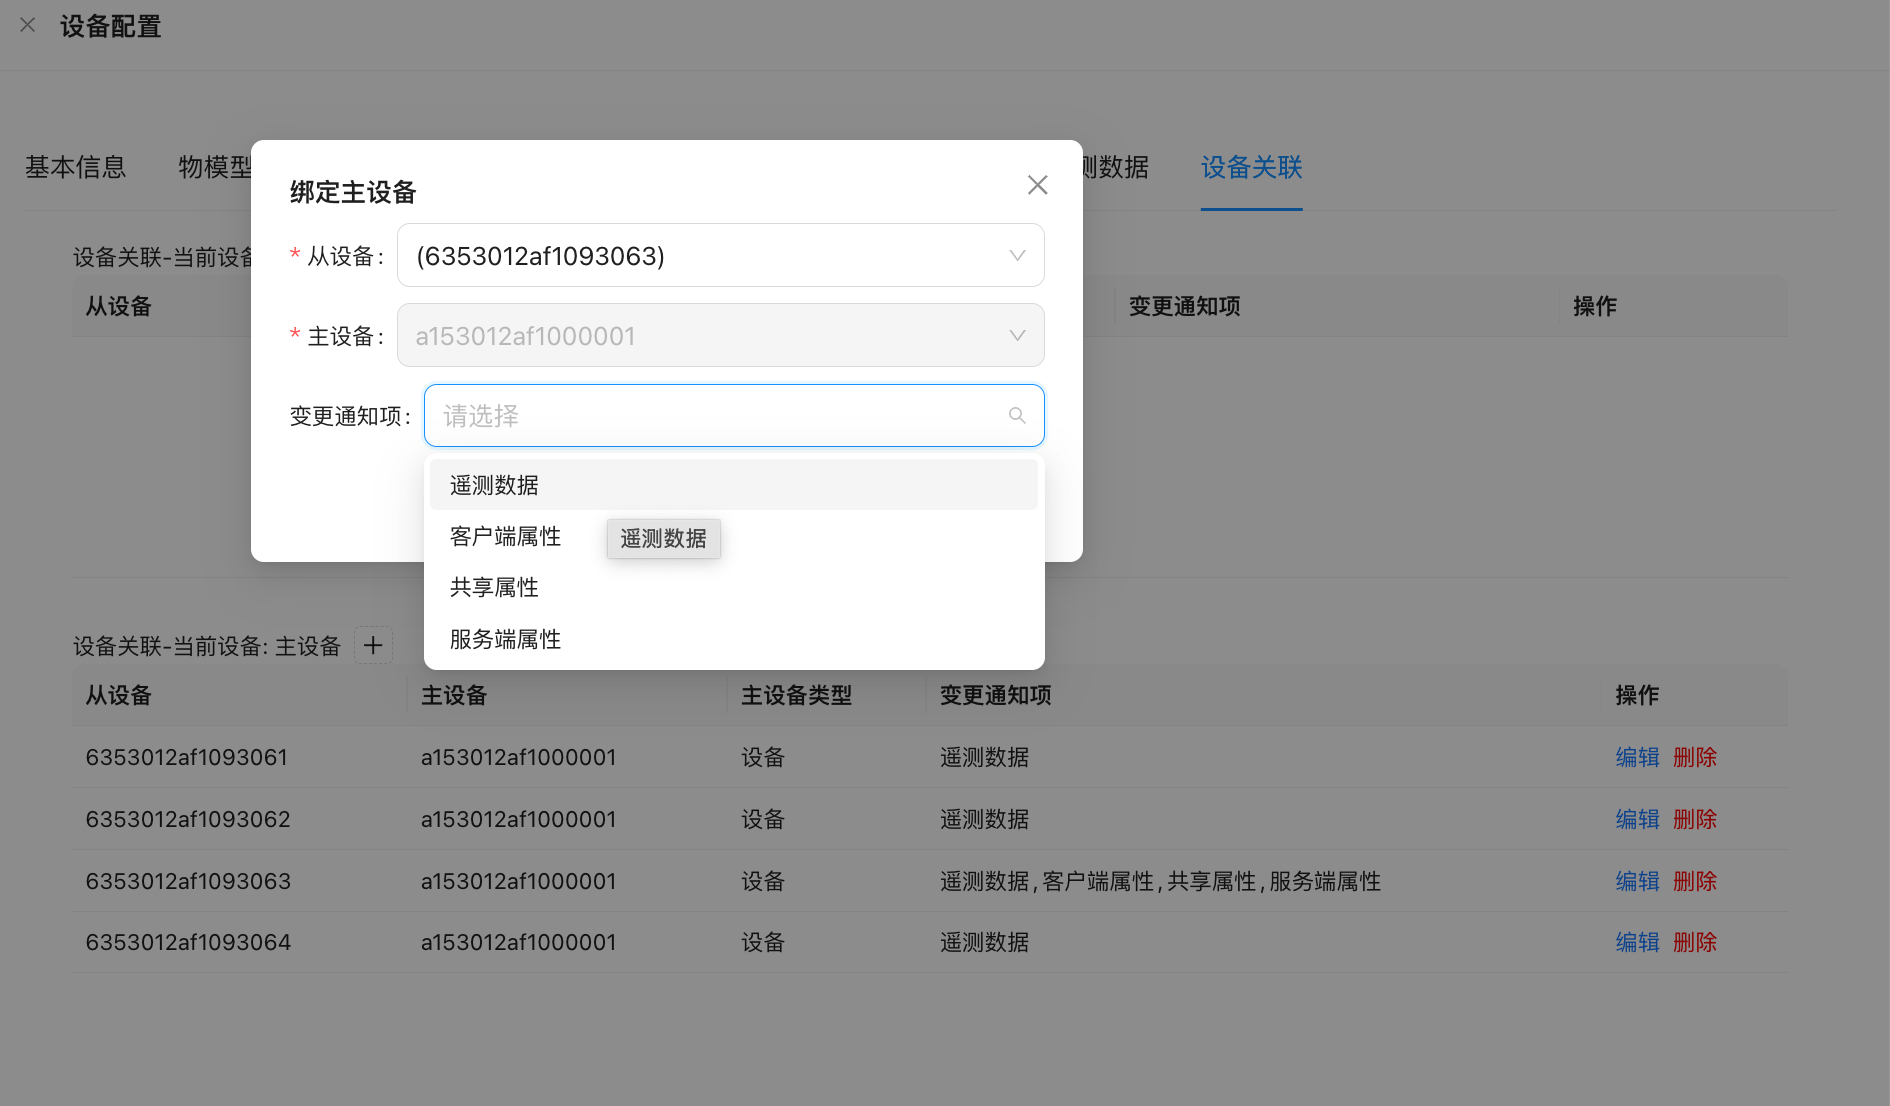
Establishes a data notification topology between devices: source device (data publisher) → target device (receives notifications and performs aggregation).
| Change Type | Trigger |
|---|---|
| Telemetry data | Source device reports new telemetry |
| Shared attributes | Platform or device modifies shared attributes |
| Server attributes | Business system modifies server attributes |
The target device's thing model script executes automatically when a notification is received. The msg parameter contains the source device's EUI and latest data.
Terminology: The UI shows "Bind Source Device / Bind Target Device", corresponding to internal keys
bind-master-device/bind-slave-device. "Source device" = formerly "slave device"; "target device" = formerly "master device".
1.4. Sub-devices
Sub-devices (SUB_DEVICE) are virtual terminals automatically generated by parent devices such as EdgeBus when polling meters. The parent device (DTU/EB compiler) polls multiple slaves via RS-485, Modbus, or similar protocols. When the thing model script parses the data for each slave, it specifies a sub-device identifier via the result.sub_device field, and the system automatically creates and maintains an independent sub-device for each identifier.
How It Works
- The parent device (
NORMALtype,data_from=LoRaWANorOTHER) reports data - The thing model script parses the payload and returns a result containing a
sub_devicefield for each polled device - The system checks whether the parent device's
server_attrsalready has an EUI mapping for thatsub_deviceidentifier - If no mapping exists, a new EUI is auto-generated, a sub-device is created, and the parent-child relationship is established
- Sub-devices independently hold telemetry data, attributes, and thing models; alerts and RPC can be configured separately
// Thing model script example: parent device polling 3 Modbus slaves
// payload distinguishes data by device address
let results = [];

// Slave 1: temperature/humidity sensor (address 0x01)
results.push({
  sub_device: "addr_01",          // sub-device identifier (unique within the parent)
  telemetry_data: {
    temperature: payload.readInt16BE(2) / 10,
    humidity: payload.readInt16BE(4) / 10,
  }
});

// Slave 2: electricity meter (address 0x02)
results.push({
  sub_device: "addr_02",
  telemetry_data: {
    energy_kwh: payload.readUInt32BE(6) / 100,
    power_w: payload.readUInt16BE(10),
  }
});

// Slave 3: CO₂ sensor (address 0x03)
results.push({
  sub_device: "addr_03",
  telemetry_data: {
    co2_ppm: payload.readUInt16BE(12),
  }
});

return results;
Best Practices
- Sub-device EUIs are auto-generated by the system; no manual assignment needed
- When defining the parent device's thing model, set
apply_totoSUB_DEVICEso the system routes to the correct sub-device - Sub-devices can be individually bound to thing models, RPC, and triggers for fine-grained alerts and control
- In EdgeBus scenarios, each slave polled by an EB APP generates one sub-device: sub-device count = parent devices × slaves per parent
1.5. Assets
An asset (VIRTUAL) is a virtual device that aggregates telemetry data from multiple devices into a higher-level logical entity. Use cases include:
- Statistical aggregation: total floor power consumption, average temperature/humidity for a zone
- Multi-metric monitoring: a single composite meter exposing multiple monitoring indicators
- Cross-device linkage: multiple sensors jointly determining an output state
Assets require no physical device to report data. They subscribe to a group of source devices via Device Association. When any source device data updates, the asset's thing model script is automatically triggered for computation.
Best Practice Examples
Example 1: Floor Total Power Consumption
Scenario: 8 single-phase power meters installed on a floor (reported as EB sub-devices). The asset device represents the aggregated power view for that floor.
// Asset thing model script (data source: 8 meters' telemetry)
if (!noticeAttrs.telemetry_data) {
  return { telemetry_data: null, server_attrs: null, shared_attrs: null };
}

// server_attrs stores each meter's latest reading (keyed by msg.eui)
let perMeterAttrs = device.server_attrs || {};

// Update the reading for the currently reporting device
perMeterAttrs[msg.eui] = {
  energy_kwh: msg.telemetry_data[msg.thing_model[0]]?.energy_kwh ?? 0
};

// Sum all known meters
let totalEnergy = Object.values(perMeterAttrs)
  .reduce((sum, m) => sum + (m.energy_kwh || 0), 0);

return {
  telemetry_data: { total_energy_kwh: Math.round(totalEnergy * 100) / 100 },
  server_attrs: perMeterAttrs,
  shared_attrs: null,
};
Example 2: Room Average Temperature and Humidity
Scenario: 4 temperature/humidity sensors installed in a meeting room. The asset represents the room's environmental average.
if (!noticeAttrs.telemetry_data) {
  return { telemetry_data: null, server_attrs: null, shared_attrs: null };
}

// Cache each sensor's latest reading in server_attrs
let sensorCache = device.server_attrs || {};
sensorCache[msg.eui] = {
  t: msg.telemetry_data[msg.thing_model[0]]?.t,
  h: msg.telemetry_data[msg.thing_model[0]]?.h,
};

// Compute average of non-null readings
let temps = Object.values(sensorCache).map(s => s.t).filter(v => v != null);
let hums  = Object.values(sensorCache).map(s => s.h).filter(v => v != null);

let avgT = temps.length ? temps.reduce((a, b) => a + b, 0) / temps.length : null;
let avgH = hums.length  ? hums.reduce((a, b) => a + b, 0) / hums.length  : null;

return {
  telemetry_data: {
    avg_temperature: avgT != null ? Math.round(avgT * 10) / 10 : null,
    avg_humidity:    avgH != null ? Math.round(avgH * 10) / 10 : null,
    sensor_count:    temps.length,
  },
  server_attrs: sensorCache,
  shared_attrs: null,
};
Example 3: Device Online Rate Statistics
Scenario: Monitor how many devices in a group are online (heartbeat timeout treated as offline).
if (!noticeAttrs.telemetry_data && !noticeAttrs.server_attrs) {
  return { telemetry_data: null, server_attrs: null, shared_attrs: null };
}

let now = Date.now();
let onlineThreshold = 15 * 60 * 1000; // 15 minutes without report = offline

let statusCache = device.server_attrs || {};
statusCache[msg.eui] = { last_seen: now };

let total = Object.keys(statusCache).length;
let online = Object.values(statusCache)
  .filter(s => (now - s.last_seen) < onlineThreshold).length;

return {
  telemetry_data: {
    total_devices: total,
    online_devices: online,
    online_rate: total ? Math.round(online / total * 100) : 0,
  },
  server_attrs: statusCache,
  shared_attrs: null,
};
1.6. Modbus TCP Integration
ThinkLink's built-in Modbus TCP Server exposes device telemetry and attributes as standard Modbus registers for SCADA/HMI consumption. Writing to a register can also trigger a bound RPC to send commands back to the IoT device.
For full configuration steps, register mapping reference, and register list export → Modbus TCP Server
Set the modbus_tcp switch to TRUE in the device's Basic Info tab to enable Modbus mapping for that device.
1.7. Device Association (Relation)
In the Device Association tab on the device details page, you can manage data notification relationships between the current device and other devices. Relationships are stored in the device_relation table, where each record contains:
| Field | Description |
|---|---|
from_eui | Source device EUI (data publisher; formerly "slave device") |
to_eui | Target device EUI (notification receiver; formerly "master device") |
notify_fields | List of attribute types that trigger notification: telemetry_data / shared_attrs / server_attrs |
params | Extension parameters (optional) |
When any data type listed in notify_fields changes for the from_eui device, ThinkLink pushes the change data to the thing model script of the to_eui device for processing. The msg parameter contains a full data snapshot of the source device.
Asset + Device Association is the core mechanism for multi-device data aggregation in ThinkLink. It requires no external script scheduling and is driven entirely within the platform.
1.8. Device Tenant Migration
To move devices from one tenant to another, you must migrate two independent objects: LoRaWAN profiles (NS-layer authentication config) and device records (data processing layer).
Non-LoRaWAN devices (
data_from = OTHER) have no LoRaWAN profile — skip directly to Step 3.
Step 1: Export and Remove LoRaWAN Profiles from the Original Tenant
- In the original tenant, go to Maintenance → Device Management → LoRaWAN Profiles
- Click Export to download all profiles as an Excel file
- Open the file and verify it is complete and contains all target device profiles
⚠️ Danger — irreversible deletion ahead. Only proceed after confirming the export file is intact. Deleting profiles without a valid export results in permanent loss of the device keys (AppKey / AppSKey / NwkSKey) — they cannot be recovered.
- Select the profiles to migrate and click Delete
Step 2: Import LoRaWAN Profiles into the New Tenant
- Switch to the target tenant
- Go to Maintenance → Device Management → LoRaWAN Profiles
- Click Import and upload the Excel file exported in Step 1
Step 3: Migrate Device Records
Follow the same export → delete → import process for the device management records:
- In the original tenant, go to Maintenance → Device Management
- Select the devices to migrate and click Export to download the device list
- Verify the exported file is complete, then delete the devices from the original tenant
⚠️ Danger: Confirm the export file is valid before deleting. Deleted device records — including bound thing models, RPCs, triggers, and attribute configurations — cannot be automatically recovered.
- Switch to the target tenant, go to Maintenance → Device Management, click Import, and upload the device list