1. RPC Model
ThinkLink (hereinafter referred to as TKL) RPC model Provides the ability to remotely control and configure parameters for LoRaWAN devices. By defining a standardized Remote Procedure Call (Remote Procedure Call), users can issue instructions to the device, set working parameters, or trigger specific actions to achieve intelligent operation and maintenance management of the device.
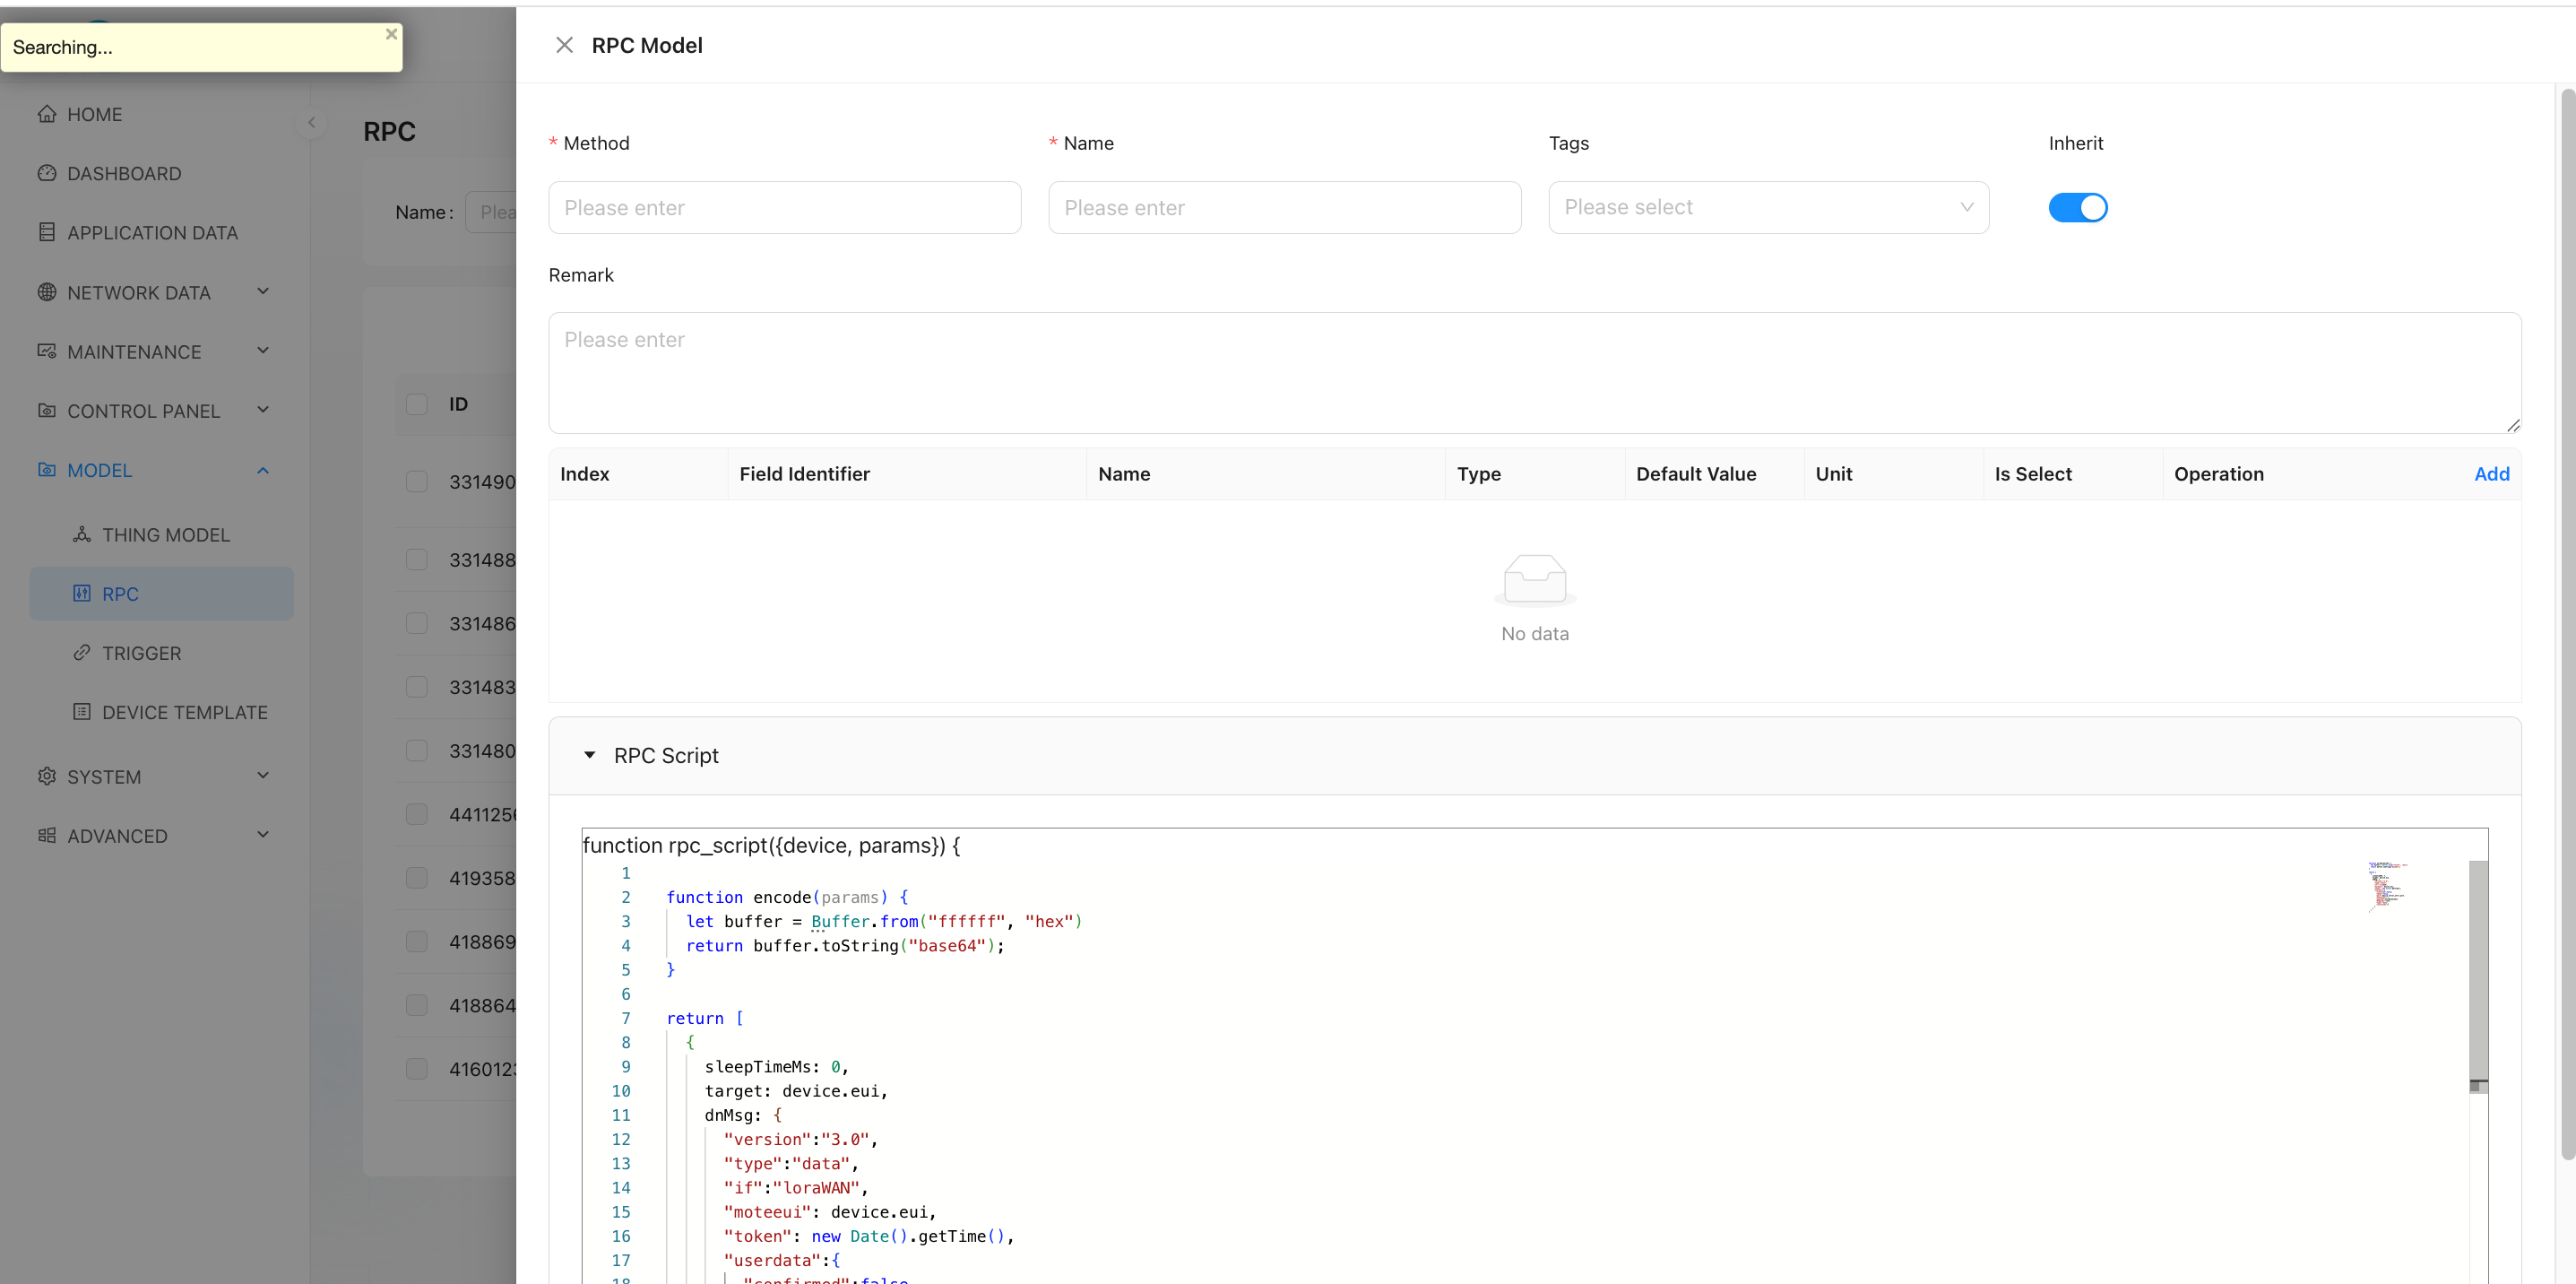
1.1. New RPC
in The TKL platform, you can create a new RPC command by following these steps:
- enter model management → RPC model → Add.
- Configure basic information and script logic.
1.2. Parameter Information
| Field | Description |
|---|---|
| Field Identifier | The variable name of the parameter in the script — i.e., the key in the params object. For example: period represents the reporting interval value and will be used in the script to read user input. |
| Method | The function name used when invoking via MQTT or other interfaces. |
| Alias | The display name shown in the user interface (UI), improving readability. For example: "Set Reporting Interval", helping users understand the purpose of the parameter. |
| Inherit | Whether this RPC can be inherited by sub-devices: ✅ true: Sub-devices under this device can use this RPC.❌ false: Sub-devices cannot use this RPC. |
✅ Multiple parameter fields can be added to support complex control requirements.
1.3. RPC Scripting
TKL supports writing custom encoding scripts using JavaScript. These scripts convert user-provided inputs into data formats compliant with the target device's communication protocol, then send them via the downlink.
Example Script:
let classMode = (device && device.shared_attrs && device.shared_attrs.class_mode) || "ClassA";
let sleepMs = classMode === "ClassA" ? 200 : 10000;
let isClassA = classMode === "ClassA";

function getDevicesInfo() {
    let buffer = Buffer.alloc(4);
    buffer[0] = 0x8F;
    buffer[1] = 2;
    buffer[2] = 100;
    buffer[3] = 96;
    return buffer.toString("base64");
}

function processSubAddr(subAddr, modelHex) {
    let addrBuffer;
    let laddrBuffer = Buffer.alloc(7);
    let substr = subAddr.replaceAll(" ", "");

    if (substr === "nc" || substr === "") {
        return null;
    }
    if (modelHex.length != 10) {
        return null;
    }

    let subnum = parseInt(substr, 10);
    if (subnum === 0) {
        for (let i = 0; i < 7; i++) {
            laddrBuffer[i] = 0;
        }
    } else {
        addrBuffer = Buffer.from(substr, 'hex');
        if (addrBuffer.length !== 7) {
            return null;
        }
        for (let i = 0; i < 7; i++) {
            laddrBuffer[i] = addrBuffer[6 - i];
        }
    }

    let hexStr = laddrBuffer.toString('hex') + modelHex;
    const buffer = Buffer.from(hexStr, 'hex');
    return buffer;
}

function encode(params) {
    let buffer = Buffer.alloc(98);
    buffer[0] = 0xCF;
    buffer[1] = 76;
    buffer[2] = 100;
    buffer[3] = 96;

    let dataSize = 0;
    let serverAttrs = {};

    for (let i = 0; i < 6; i++) {
        const subAddr = params['sub_addr' + (i + 1)];
        if (!subAddr || subAddr === "nc") {
            buffer.writeUint32LE(0xFFFF, i*2+4); // Set as 10 years
            continue;
        }

        const modelHex = params['model' + (i + 1)];
        if (modelHex === "0000000000") {
            buffer.writeUint32LE(0xFFFF, i*2+4);
            continue;
        }

        let period = params['period' + (i + 1)];
        let payload = processSubAddr(subAddr, modelHex);

        serverAttrs['sub_' + subAddr.replaceAll(" ", "")] = {
            addr: subAddr.replaceAll(" ", ""),
            model: modelHex,
            period: period,
        };

        serverAttrs['model' + (i + 1)] = modelHex;
        serverAttrs['period' + (i + 1)] = period;

        if (payload === null) {
            buffer.writeUint32LE(0xFFFF, i*2+4);
            continue;
        }

        period = (period) & 0x7FFF;
        period |= 0x4000;
        buffer.writeUint32LE(period, i*2+4);
        payload.copy(buffer, 26 + i*12, 0, 12);
        dataSize += 12;
    }

    if (dataSize === 0) {
        return null;
    }

    buffer[1] = 24 + dataSize;
    buffer[3] = 22 + dataSize;

    let retBuffer = Buffer.alloc(26 + dataSize);
    buffer.copy(retBuffer, 0, 0, 26 + dataSize);

    return {
        sAttrs: Object.keys(serverAttrs).length < 1 ? null : serverAttrs,
        payload: retBuffer.toString("base64")
    };
}

let rdata = encode(params);
if (rdata === null) {
    return null;
}

return [
    {
        sleepTimeMs: 100,
        type: "modifyAttrs",
        dnMsg: {
            server_attrs: rdata.sAttrs,
        }
    },
    {
        sleepTimeMs: 0,
        dnMsg: {
            "version": "3.0",
            "type": "data",
            "if": "loraWAN",
            "moteeui": device.eui,
            "token": new Date().getTime(),
            "userdata": {
                "confirmed": isClassA,
                "fpend": false,
                "port": 214,
                "TxUTCtime": "",
                "payload": rdata.payload,
                "dnWaitms": 3000,
                "type": "data",
                "intervalms": 0
            }
        }
    },
    {
        sleepTimeMs: sleepMs,
        dnMsg: {
            "version": "3.0",
            "type": "data",
            "if": "loraWAN",
            "moteeui": device.eui,
            "token": new Date().getTime() + 1,
            "userdata": {
                "confirmed": true,
                "fpend": false,
                "port": 214,
                "TxUTCtime": "",
                "payload": getDevicesInfo(),
                "dnWaitms": 3000,
                "type": "data",
                "intervalms": 0
            }
        }
    }
];
1.3.1. Input Parameters
device
Represents the target device object. You can access the following properties:
device.shared_attrs: Shared attributes across platforms.device.server_attrs: Server-side attributes stored in the TKL system.device.telemetry[thingmodelId]: Latest telemetry data. ReplacethingmodelIdwith an actual ID.
Example:device?.telemetry_data?.["45616600866361349"].TP
📌 When calling RPC via MQTT or HTTP, you must explicitly provide the device EUI, using the field name _eui.
params
An object containing all user-input parameters provided through the UI or API.
| Attribute | Description |
|---|---|
| Attr Name | Used in JS scripts as params.xxx to retrieve input values. |
| Index | Determines the display order of parameters in the UI. |
| Alias | Friendly name shown in the UI for better understanding. |
| Type | Supported types: number, string, boolean, object. |
| Default Value | Value used if no input is given. |
| Unit | Physical unit appended during display (e.g., s, min, ℃). |
| Options | Dropdown list options in key-value pair format. |
alarmsStores alarm information for the corresponding device. You can check whether a specific alarm (identified by alarm_name) exists by accessing alarms[[alarm_name]]. The RPC code can perform corresponding logic processing based on the status of the relevant alarm.
loggerLogs for RPC operations. The usage of logger is consistent with console, where user-defined messages must be passed as an Object assigned to the "params" variable. The logger supports three log levels: info, warn, and error, facilitating message filtering and searching by severity level.
Example usage:
logger.info("set my paras", {params: paras})1.3.2. Return Parameters
A single RPC can execute multiple sequential commands. Each item in the returned array conforms to one of the following structures:
- Type 1: Send Device Command (LoRaWAN or Non-LoRaWAN Devices)
Used to deliver standard-formatted messages via Topic.
[EN] PTL-S05 ASP LoRaWAN NS and Application Server Communication Protocol
The message follows this JSON structure:
{
    "version": "3.0",
    "type": "data",
    "if": "loraWAN",
    "moteeui": "ABCDEF1234567890",
    "token": 1712345678901,
    "userdata": {
        "confirmed": true,
        "fpend": false,
        "port": 214,
        "TxUTCtime": "",
        "payload": "base64_encoded_data",
        "dnWaitms": 3000,
        "type": "data",
        "intervalms": 0
    }
}
🔗 For non-LoRaWAN devices, the same format should be listened on their designated topics.
- Type 2: Modify Device Attributes
Use type: "modifyAttrs" to update device attributes (server_attrs or shared_attrs) within the platform database, without sending any data to the physical device.
Example – Update server_attrs:
{
    "sleepTimeMs": 100,
    "type": "modifyAttrs",
    "dnMsg": {
        "server_attrs": {
            "covtemp": 15
        }
    }
}
This operation writes the specified attribute directly into the TKL database.
⚠️ No actual message is sent to the device. This only updates internal platform state.
- Type 3: Alarm
The alarm function is implemented by settingtype: "alarm". For a device/asset to enable the alarm feature, users must configure trigger model. The triggering logic should be defined in the designated trigger model, and alarm notifications are realized via RPC calls related to the alarm.
Field descriptions:
| Field | Description |
|---|---|
| action | Type of alarm action, with two options: - "new": Creates a new alarm event - "clear": Clears the existing alarm event |
| alarm_name | Name of the corresponding alarm event. Each name represents a unique alarm type. Users must manage alarm events, and different alarm events must have distinct names. |
| notice_groups | Email notification groups. When a group is selected, an email will be sent to the associated email group upon occurrence of the alarm event. |
| title | Title displayed when the alarm event occurs. |
| desc | Description of the alarm event. |
| level | Alarm severity level, categorized into four types: "low", "mid", "high", "urgent". |
example:
{
  sleepTimeMs: 0,
    target: device.eui,
    type:"alarm",
    dnMsg: {
    action:"new",
      data:{
        alarm_name: "alarm test",
        notice_groups: [],
        title: title,
        desc:  "this is a alarm",
        level: "high",
      }
   }
}- Common Fields in Downlink Commands
| Field | Description |
|---|---|
| sleepTimeMs | Delay (in milliseconds) before sending this command. Useful for controlling timing between multiple downlinks. |
| target | Default: EUI of the target device. When operating on sub-devices, set to device.parent, because the command must be forwarded through the parent device. |
| type | Specifies the type of instruction: • default: Normal downlink message • modifyAttrs: Update server/shared attributes |
✅Best Practice: Always test RPC scripts in a development environment before deployment. Use the built-in debugger to validate output payloads and ensure proper encoding.
1.4. MOUNT RPC
the created RPC must be bound to a specific device before it can be used.
- Operation Path:
Operation and maintenance management → equipment management → select target equipment → Details → RPC - operation steps:
- on the Device Details page, click the RPC tab.
- Click Add and select the created RPC from the drop-down list.
- Repeatably add multiple different RPCs to the same device.
✅ Supports mounting multiple RPCs on one device, which is suitable for multi-function control scenarios.
1.5. Execute RPC
after the RPC is successfully mounted, you can call the device remotely.
- Operation Path : same as above, enter device details → RPC Management Interface
- operation mode:
- locate the mounted RPC entry.
- Click in the corresponding operation column execution button.
- Input window pops up, fill in the parameter values (according to the "Alias" prompt input).
- After confirmation, the system will call the script to generate instructions and send them to the device.
The execution result can be viewed in the log or device response, depending on the device return mechanism and confirmation mode settings (Confirmed/Unconfirmed).
Through flexible configuration RPC model TKL realizes the fine remote control ability of LoRaWAN equipment, and provides an efficient means for equipment debugging, configuration update and fault disposal.
1.6. Alarm RPC
ThinkLink has built-in a general-purpose alarm RPC function called ALARM. To use it, you need to mount the ALARM RPC onto the corresponding device or asset. After configuring the trigger model, the alarm functionality can be achieved. The default ALARM is as follows:
function rpc_script({device, params,alarms,logger}) {
    const ACTION = {  no:"no","new": 'new',clear: 'clear'};
    let group = params?.group?.notify ?? []
    let alarm_name = params?.name ?? "[alarm]";
    let action = params?.action ?? ACTION.no;
    let title = params?.title ?? "[tile]";
    let desc = params?.desc ?? "this is a description of alarm";
    let level = params?.level ?? "low";
    switch (action){
        case ACTION.clear: break;
        case ACTION.new:
            let alarmInfo=alarms[alarm_name]
            if (alarmInfo===undefined){break}
            if (alarmInfo.title!==title){break}
            if(alarmInfo.desc!==desc) {break}
            if (alarmInfo.level!==level) {break}
            action = ACTION.no
            break
        default: return null
    }
    if(action===ACTION.no){ return null}
    return [
        {
            sleepTimeMs: 0,
            target: device.eui,
            type:"alarm",
            dnMsg: {
                action:action,
                data:{
                    alarm_name: alarm_name,
                    notice_groups: group,
                    title: title,
                    desc:  desc,
                    level: level,
                }
            }
        }
    ]
}
Example of trigger model:
function trigger_script(device, thingModelId) {
    const ACTION = {  no:"no",new: 'new',clear: 'clear'};
    const LEVEL={low:'low',mid:'mid',high:'high',urgent:'urgent'}
    let name="alarm_bin"
    let title="Alarming : ["+device.name+"]"
    let desc=""
    let level=LEVEL.high
    let group=device.server_attrs?.group===undefined??[];
    let action=ACTION.clear
    let tdata=device?.telemetry_data[thingModelId]
    if(tdata?.depth==undefined&&tdata?.weight1==undefined){ return null}
    if (tdata?.depth<=device.server_attrs.alarm_depth) {
            desc="["+device.name +"]"+"warning, please process "
            action=ACTION.new
    }
    if (tdata?.weight1 >= device.server_attrs.alarm_weight) {
            desc="["+device.name +"]"+"caution!!!!"
            action=ACTION.new
    }
    return {
        delayms: 0,
        abort_previous_timer: true,
        actions: [{
            method: "alarm",
            params: {
                _eui:device.eui,
                action:action,
                name:name,
                title:title,
                level:level,
                desc:desc,
                group:group
            }
        }]
    }
}